Managing Site DTLs


Available and Upcoming DTLs

Introduction

The Available and Upcoming DTLs screen is an informational-only screen that provides a way to view which studies currently require or will soon require a DTL. It lists all DTL templates which are in Activated and Approved statuses, as well as their Required By dates (when applicable).

The page is accessible to all user types by navigating to Site DTL > Available and Upcoming DTLs in the menu (see Figure 1).

Available and Upcoming DTLs menu

Figure 1: Available and Upcoming DTLs - Menu Item.

Grid

The Available and Upcoming DTLs grid includes the following information (see Figure 2):

  • Protocol - The protocol using the template.
  • LPO - The Lead Protocol Organization associated with the template.
  • Template Status - The current status of the template. Only templates with statuses of Activated and Approved are listed. Note that a template with an Approved status can be associated with a study that has not yet activated for participation. It can also indicate that an already-active study either has a new upcoming DTL requirement (rare) or already has a DTL and will be releasing a new template version.
  • Required By Date - The Required By Date of the Protocol Specific Requirement (PSR). A date will display for templates in an Activated status. When the template status is Approved, the date value is blank.

Sorting, filtering, and export of grid data is available.

Available and Upcoming DTLs screen

Figure 2: Available and Upcoming DTLs Screen.

Initiating and Cloning Site DTLs

Introduction

Any individual affiliated with the site on the Lead Protocol Organization (LPO) or a Participating Organization (PO) roster may initiate a DTL. There are two ways to initiate a site DTL; instructions for both methods are included within this section. You can create a new site DTL from scratch, or you can clone an existing site DTL to a single or multiple new sites or protocols.

Important Reminder: All DTLs are site and protocol-specific regardless of whether they are created individually or through the cloning process, and all require Clinical Investigator (CI) sign-off for approval.

Creating a New Site DTL

To begin the process of initiating a new site DTL from scratch, click the + Site DTL Initiate Site DTL button button in the upper right corner of the Site DTL Browser or click on the + Create New DTL Quick Link in the Dashboard; this will open the first page of the Initiate New Site DTL wizard.

Using the drop-down lists, select the site and protocol for which you wish to create a site DTL and click the Fetch DTL Template Information button (see Figure 3).

Initiate DTL screen

Figure 3: Initiate New Site DTL Screen.

Sites available for selection include any site on which you have an Active or Followup status on the roster. Available protocols are refreshed based on the site selected. They are those with an active DTL template, at least one of your affiliated organizations (e.g., Alliance) acts as the LPO or a PO, and a site DTL does not already exist for the site/protocol combination.

Once you have selected the site and protocol, click on the Fetch DTL Template Information button and the second page of the Initiate New Site DTL wizard will display the DTL Template Information and the Task List. The Task List displays the required tasks for the DTL Template, including if the task is primary or required, if CI signature is required, allowed registration types, if the individual assigned the task must be on a participating roster at the site, and any task-specific training requirements. To initiate a site DTL, click the Initiate Site DTL Initiate Site DTL button button located under the Task List.

Task List

Figure 4: Task List.

Important Note: If you leave the DTL application prior to selecting the Initiate Site DTL button, your selection will not save.

If the DTL was successfully initiated, the application will display the Manage Site DTL screen, where tasks can be assigned. (See the Managing Task Assignments topic for more information.)

Cloning a Site DTL

Warning: Use the clone feature judiciously as DTLs will be reviewed during an audit and must be accurate for the study in question. After cloning a DTL, modify task assignments as necessary to ensure that all clinical site staff responsible for the conduct of the study are included on the DTL. Remove staff that have no responsibilities at the site/study.

Rules about which DTLs can and cannot be cloned:

  • You can clone a DTL in any status except Retired or Retiring, but best practice is to clone only approved DTLs.
  • You cannot clone DTLs for protocols in a terminal status (Administratively Complete or FDAAA Complete) or DTLs managed in the Canadian Clinical Trials Group’s (CCTG) Roster Interface Program and Participants List Environment (RIPPLE) application (see Canadian Sites and DTLs) for more information about DTLs for Canadian sites).
  • At the task level, only tasks in Approved or Awaiting CI Approval status will be cloned.

Cloning can be initiated from one of two screens, the Site DTL Browser screen or the Clone DTLs screen. Both are accessible from the Dashboard or via the menu items at the top of the application screen (see Figures 5 and 6).

Clone DTLs - Quick Links

Figure 5: Links from Dashboard Quick Links.

Clone DTLs - Menu

Figure 6: Links from Menu.

To start the process from the Site DTL Browser, complete the following steps:

  1. Locate the DTL you want to clone within the Site DTL Browser.
  2. Select the Clone Clone DTLs - Menu icon under the Actions column.
  3. The Clone DTLs screen will display. The site DTL that is being cloned will be preselected in Step 1.
  4. Complete the remaining steps in the clone DTLs workflow, starting with Step 2 as described in the next section.

To start the process from the Clone DTLs screen, navigate there from the Dashboard Quick Links or the Site DTL menu item and then follow these steps:

Step 1: Select DTL to Clone (see Figure 7)

  1. Select the DTL you would like to clone.
    • The grid will display the site code, protocol number, and DTL status of DTLs available for cloning.
    • Available DTLs are those at your associated sites in any status except Retired or Retiring.
    • Use the filters to search for the desired DTL.
    • Once you select a DTL, you can use the icon View selected DTL in a new tab in the Step 1 heading to view the selected DTL in a new tab; this will allow you to review what you are cloning and confirm that you have selected the correct DTL.
Select DTL to clone

Figure 7: Select DTL to Clone.

  1. Select the DTL you would like to clone.

Step 2: Select Type of Clone (see Figure 8)

  1. You may choose to clone the DTL to different sites for the same protocol or different protocols for the same site. You cannot do both.
Select type of clone

Figure 8: Select Type of Clone.

Step 3: Select New DTLs (see Figure 9)

  1. Depending on the selection in Step 2, use the Select All DTL(s) option or select individual sites or protocols that you wish to clone the DTL to.
Select New DTLs

Figure 9: Select New DTLs.

    • Use the Site and Protocol filters to search for site/protocol combinations.
    • Use the Clear Filters button to clear Step 3 selections.
    • Deselect any DTL that you do not want to clone.
    • Use Select All DTL(s) checkbox to select or unselect all your DTLs.
  1. After review, select the Submit button to submit your request.
    • A Confirm Clone modal will display (see Figure 10). The grid should list each row as the Site and Protocol combination (DTL) selected in Step 3.
Confirm Clone Pop-up

Figure 10: Confirm Clone.

  1. On click of the Confirm button the bulk clone request is submitted, and you are taken to a confirmation screen (see Figure 11).
Bulk Clone Request Confirmation Screen

Figure 11: Bulk Clone Request Confirmation Screen.

    • Click the Start New Clone Site DTLs Operation link to begin another bulk clone.
    • Click the Go to Site DTL Browser link to navigate to the Site DTL Browser page. Note that if you return to the Site DTL Browser, you will see the newly initiated DTLs, but they will be locked until all processing is complete.
    • Click the Request Browser link within the body of the message to view the progress of your bulk clone request as well as details about the request. (See the Request Browser Overview topic for more information.)

Automatic Cloning with a New Template Version

Sometimes an LPO activates a new version of a DTL template; this is typically done to update the list of tasks included on the template. When this happens, the following occurs:

  1. An automated email goes out to all relevant CIs and DTLAs notifying them of the new template version.
  2. Site DTLs on the previous template version are automatically cloned/copied to the new template version (unless they are already Retired due to a Withdrawn site registration status).
  3. Sites will temporarily have two versions of their site DTL (see Figure 12):
    1. Approved site DTLs on the previous version will have a status of Retiring; those with all other statues will be set directly to Retired.
    2. The new site DTL will have a status of Initiated.
Automatic Cloning with a New Template Version

Figure 12: Automatic Cloning with a New Template Version.

  1. Sites have a 60-day grace period during which they must make any necessary updates to the Initiated version of the DTL, and the CI must approve the new version. If this does not happen by the 60-day deadline, the new DTL will remain in Initiated status, but the site registration status for the study will be Pending until the new version is approved.
  2. Upon approval of the new version or at the end of the 60-day grace period, whichever happens first, the previous version of the site DTL will go to a status of Retired.

Submitting DTLs for Approval

DTLs are generally submitted to the Clinical Investigator (CI) for approval by the DTL Administrator (DTLA), although for brand new DTLs, the submitter is not required to be a DTLA. Furthermore, DTLs that are due for annual approval aren’t submitted, but are automatically provided to the CI for signature.

Three types of submit actions are described in this section:

  1. Submitting a Single Initiated DTL for Approval
  2. Submitting an Updated DTL for Approval
  3. Submitting Multiple Initiated DTLs for Approval

Submitting a Single Initiated DTL for Approval

To submit a new/initiated site DTL for CI sign-off, the site must:

  1. Have a current IRB approval on file with the CTSU. If no IRB approval is on file for the site, a status reason of “No IRB Approval on file for this site” will appear in the status reason column for the following task assignments: Clinical Investigator, Enrolling Person/Treating Investigator, and Consenting Person.
  2. Ensure all required tasks are assigned to satisfy the minimum requirements.

When all required task assignments are made and the site’s IRB approval is on file, the Submit DTL button will be enabled (see Figure 13) and can be clicked to submit the DTL for CI sign-off; a confirmation popup will appear. Once the system processes the request, the DTL’s status will update to Awaiting CI Approval. Note that the CI will not receive an email about the new site DTL unless the DTLA uses the Notify CI functionality (see next section; the CTSU recommends that this feature be reserved for situations where the CI signature is required urgently). Otherwise, the new site DTL will be available on the CI’s DTL Approvals screen and will be part of the Bi-Monthly Signing Notification email.

Submit DTL button enabled

Figure 13: Enabled Submit DTL button.

If the assigned CI or DTLA needs to make changes to a DTL the first time it is in an Awaiting CI Approval status, they may revert the DTL to an Initiated state, make the necessary updates, and then re-submit the DTL for CI approval. To revert the DTL, locate the DTL under the Site DTL Browser and select the Revert Revert DTL icon icon above the Task Assignments grid on the Manage Site DTL screen (see Figure 14).

Revert DTL icon on Site DTL Browser

Figure 14: Revert DTL icon.

A popup will appear to confirm that you would like to revert the DTL to an Initiated status. Select Confirm to finish reverting the DTL status. A message will display if the DTL was successfully reverted, and the DTL status will change back to Initiated.

Submitting an Updated DTL for Approval

When a site DTL has changes that require CI signature, it will automatically be made available on the CI’s DTL Approvals screen and will be part of the Bi-Monthly Signing Notification email. If there is an urgent need for the CI to sign the updated DTL, the assigned DTLA can send an email notification to the CI that the updated DTL is available for approval. A Notify CI button should display above the Task Assignments grid on the Manage Site DTL screen (see Figure 15).

Notify CI button

Figure 15: Enabled Notify CI button.

The button will display if there is valid reason for signing the DTL:

  • The DTL is in Awaiting CI Approval, Approved, or Unapproved status.
  • The current user has an Active, Awaiting CI Approval, or Pending DTLA task assignment on the DTL.
  • There is a valid reason for signing the Site DTL.
    • Reasons include when the site DTL has changes ready to be approved and there is at least one task on the DTL where the task status is in Awaiting CI Approval.
    • Note that not all task assignments require a CI signature to be activated. See the DTL Master Task List and the Clinical Investigator (CI) Signature Requirement column for information on which tasks do not require signature.

On click of the button, a confirmation popup should appear (see Figure 16). Select Send Email to send an email to the CI. There are no restrictions on the number of emails a DTLA can send for a given DTL, but as noted previously, the CTSU recommends using this feature judiciously.

Notify CI modal

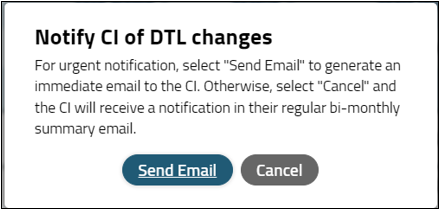
Figure 16: Confirmation request popup with Send Email button.

Submitting Multiple Initiated DTLs for Approval

The bulk submit DTLs for approval operation allows users to submit multiple initiated site DTLs to the CI(s) for approval. Any rostered site staff member can submit initiated DTLs for approval, they do not need to be a CI or DTLA.

Site users can access the Submit Initiated DTLs to CI for Approval screen by selecting Site DTL > Submit for Approval in the menu or via the Submit DTLs for Approval Quick Link in the Dashboard (see Figures 17 and 18).

Submit for Approval menu item

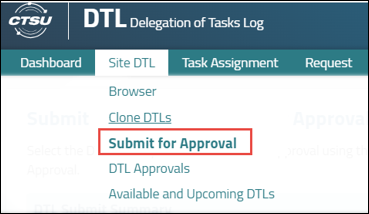
Figure 17: Submit for Approval menu item.

Submit DTLs for Approval Quick Link

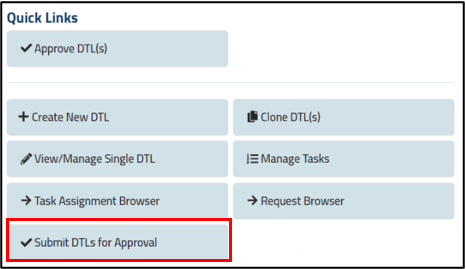
Figure 18: Submit DTLs for Approval Quick Link.

If the user does not have any DTLs available to be submitted, they will receive a message stating this fact.

If they do have DTLs available for submission, the resulting screen contains two sections, DTL Submit Summary and the DTLs in Initiated Status grid.

DTL Submit Summary

The DTL Submit Summary section displays if the user has at least one DTL to submit for approval. The summary will list the number of DTLs that are selected out of the total number possible in the grid, as well as a Submit button (see Figure 19).

DTL Submit Summary

Figure 19: DTL Submit Summary.

DTLs in Initiated Status Grid

The DTLs in Initiated Status section includes the following information (see Figure 20):

  • Select All DTL(s) - when this checkbox is selected, the checkbox in every row of the grid will be checked. The total number of DTLs will display in the DTL Submit Summary.
    • Each row in the grid has a checkbox allowing you to select or unselect individual DTLs.
  • Site - the CTEP ID for each site relevant to an Initiated DTL. An i button i button next to the site provides more information on the institution.
  • LPO - the Lead Protocol Organization (LPO) associated with the DTL.
  • Protocol - the protocol relevant to the DTL. An i button i button next to the protocol provides more information on the protocol.
  • Protocol Status - the status of the protocol.
  • Assigned CI - the name of the CI assigned on the DTL. An i button i button next to the assigned CI provides more information on the person.
  • Updated Date - the date when the DTL was last updated.
  • Actions - a View DTL icon View DTL icon will display, allowing the user to review information on the DTL in the Manage Site DTL screen in a new browser tab.

The ability to sort, filter, and export grid data is available; filters are hidden by default but can be displayed using the funnel icon.

DTLs in Initiated Status grid

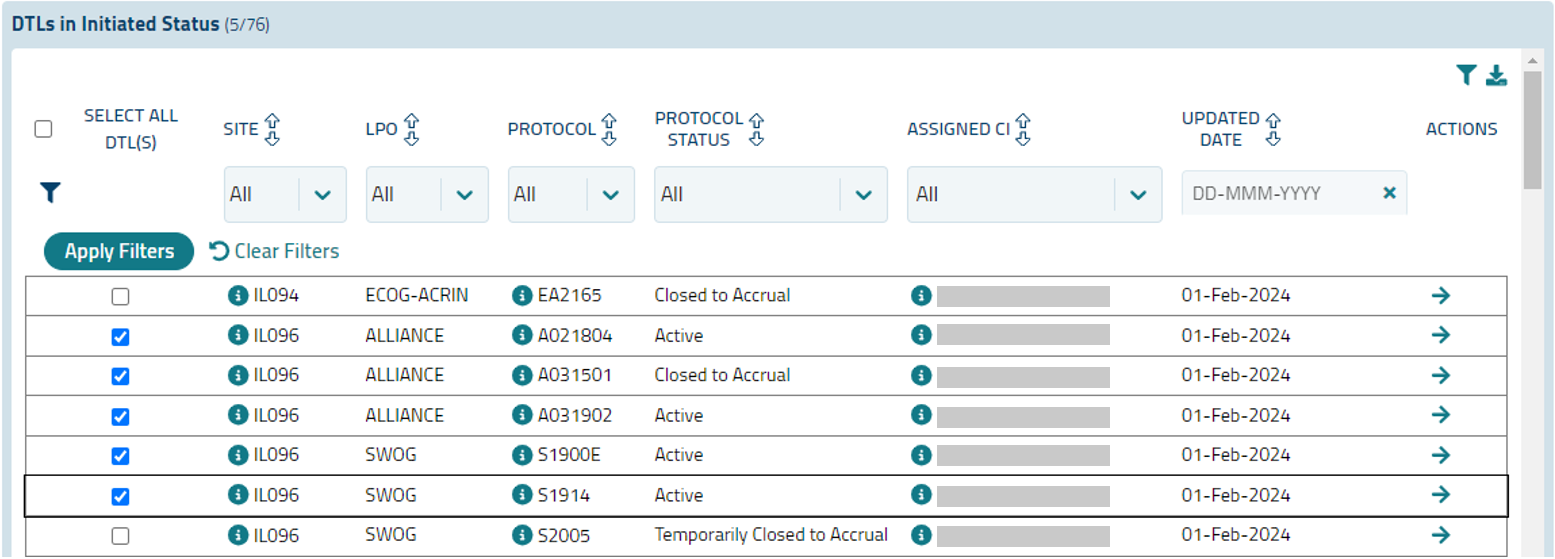
Figure 20: DTLs in Initiated Status grid.

Submit Process

A Submit button is visible in the DTL Submit Summary section. The button is enabled if at least one DTL in the DTLs in Initiated Status grid has been selected.

When the button is clicked, a popup appears. A message appears in the popup, asking you to confirm whether you want to submit the DTLs (# selected from the grid) to the CI(s) for approval (see Figure 21).

Submit DTLs confirmation request

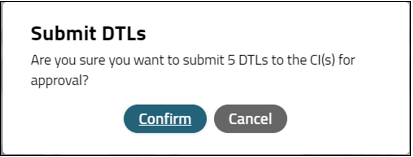
Figure 21: Submit DTLs confirmation request.

Click on the Confirm button and the request will be processed. You will then be taken to a Confirmation screen (see Figure 22).

Submit Initiated DTLs to CI for Approval Confirmation screen

Figure 22: Submit Initiated DTLs to CI for Approval confirmation screen.

  • Click the View Requests link to navigate to the Request Browser. All requests will display in the grid.
  • Click the Go to Site DTL Browser link to navigate to the Site DTL Browser page. Note that if you return to the Site DTL Browser, you will see the newly submitted DTLs, but they will be locked until all processing is complete. At that point, the locks will be removed and the DTLs will be in the Awaiting CI Approval status.
  • Click the Request Browser link within the body of the message to view the progress of this individual request, as well as details about the request.
  • Note: See the Help Topic Request Browser Overview for more information about the Request Browser.

Deleting Site DTLs

Any person associated with the site may delete a DTL if it is in an initiated status. The Site DTL must have never been signed (i.e., it cannot have been signed, manually retired, and then reinitiated back to an initiated status. See Retiring and Reinitiating Site DTLs for more information about retiring a Site DTL). To delete a never-signed DTL, locate it in the Site DTL Browser and select the delete Delete DTL icon icon. A Confirm Deletion popup will appear. Select the Confirm button to delete the DTL. A message will appear confirming the DTL was successfully deleted, and it will disappear from the browser.

The CTSU cannot restore deleted DTLs.

Note: If a DTL is in an initiated status but there is no delete icon visible, check the Updated By column; it probably says System and not an individual’s name. You must first make a change to the DTL (e.g., add any task assignment) and save the change. Once an individual’s name appears in the Updated By column, the delete icon will become available and you can proceed as described. This process will also work for DTLs generated/initiated by the system upon release of a new DTL version. If there continues to be no Delete icon, check the DTL audit history and if the DTL was ever approved, that is why the icon is not visible.

Retiring and Reinitiating Site DTLs

Introduction

Retiring a site DTL will remove a DTL from default views and eliminate the need for ongoing maintenance and approval. It is a good option for sites that have institutional review board (IRB) approval for a study (i.e., under their NCI Central IRB signatory) but have determined they will not participate, and it is not practical to withdraw the site registration. Keep in mind that if a site DTL is in Initiated status and has never been signed, deleting the DTL is more appropriate. For more on deleting a site DTL, please see the Deleting Site DTLs Help Topic.

The reinitiate function can be used to pull a site DTL out of retirement, e.g., after manually retiring a site DTL the site decides to participate on the study or needs to receive a transfer patient. The site can also reinitiate a site DTL that was automatically retired due to a withdrawn site registration status.

Retiring a Site DTL

Site staff can retire a site DTL if the following criteria are met:

  • The user is the DTL Administrator (DTLA) or Clinical Investigator (CI) on the site DTL
  • There are no patients enrolled to the study at the site
  • The site DTL status is one of the following: Approved, Unapproved, Initiated (if signed at least once in the past), or Awaiting CI Approval (if signed at least once in the past).
  • The protocol is in any status except FDAAA/IRB Completed
  • The site DTL is not locked by bulk processing
  • The site DTL is not managed in the Roster Interface Program and Participants List Environment (RIPPLE) (Canadian sites only)

To begin the process of retiring a site DTL, select an individual DTL from the Site DTL Browser and use the View DTL icon under Actions to access the Manage Site DTL screen for that DTL. 

If all criteria have been met, a Retire button will be visible above the upper right corner of the grid (see Figure 23).

Retire button for Retiring Site DTL

Figure 23: Retire Button.

Upon use of the button, a confirmation popup will display (see Figure 24).

Popup for Retiring Site DTL

Figure 24: Manually Retire Site DTL popup.

If after reviewing the content of the popup you have changed your mind, select Cancel to close the popup with no changes. If you are sure you want to retire the site DTL, select Confirm. This will close the popup and refresh the Manage Site DTL screen; the DTL status in the summary bar will be updated to Retired (see Figure 25).

Retired DTL Status in Summary Bar

Figure 25: Retired DTL status in summary bar.

Note that once a site DTL is retired, it will no longer appear in the default view of the Site DTL Browser; to locate a retired DTL you must update the DTL Status filter to include Retired (see Figure 26) and apply the updated filter.

Setting DTL Status filter to include Retired

Figure 26: Setting DTL Status filter to include Retired.

If you look at the DTL’s Audit History, you will note that the new retired status is included, along with the user who enacted the change (see Figure 27). Furthermore, the Site DTL Summary Report will indicate that all task assignments have been end-dated, and after the overnight refresh, the Site DTL Retired Date Range(s) will display the retirement date (see Figure 28).

DTL Audit History with Retired DTL

Figure 27: DTL Audit History with retirement.

DTL Summary Report with retirement date and task assignment end dates

Figure 28: DTL Summary Report with retirement date and task assignment end dates.

Reinitiating a Site DTL

Site staff can reinitiate a retired site DTL if the following criteria are met:

  • The site DTL status is Retired.
  • The retired site DTL is on the currently active DTL template for the study (if there is a newer template version, the site can simply initiate a new site DTL on that template version).
  • The site registration for the study is Pending or Closed. If the site registration is Withdrawn, this must be updated to Pending or Closed before reinitiating the site DTL; the CTSU Regulatory Office can assist with this step.
  • The site DTL is not managed in RIPPLE (Canadian sites only).

To begin the process of reinitiating a site DTL, select an individual DTL from the Site DTL Browser. (As shown previously in Figure 26, you will need to include Retired in the DTL Status filter to locate the retired DTL). Use the View DTL icon under Actions to access the Manage Site DTL screen for that DTL. 

If all criteria have been met, a Reinitiate button will be visible above the upper right corner of the grid (see Figure 29).

Reinitiate DTL button

Figure 29: Reinitiate DTL button.

Upon use of the button, a confirmation popup will display (see Figure 30).

Reinitiate DTL Popup

Figure 30: Manually Reinitiate Site DTL popup.

If after reviewing the content of the popup you have changed your mind, select Cancel to close the popup with no changes. If you are sure you want to reinitiate the site DTL, select Confirm. This will close the popup and refresh the Manage Site DTL screen; the DTL status in the summary bar will be updated to Initiated (see Figure 31).

Initiated DTL Status in Summary Bar

Figure 31: Initiated DTL status in summary bar.

If you look at the DTL’s Audit History, you will note that the new initiated status is included, along with the user who enacted the change (see Figure 32). Furthermore, after the overnight refresh, the Site DTL Summary Report will provide the full date range for the previous retirement(s) (see Figure 33).

Reinitiated Site DTL in Audit History

Figure 32: DTL Audit History with reinitiation.

DTL Summary Report with completed Site DTL retirement date range

Figure 33: DTL Summary Report with completed site DTL retirement date range.

Notes:

  • Although the site DTL status is now Initiated, you will not be able to delete the DTL, since it would have been signed in the past. You must retire it again if you decide you do not want to maintain it.
  • The newly initiated site DTL can be updated and then submitted for CI approval per the usual process. Only once it is approved will the site DTL protocol specific requirement (PSR) be satisfied and the site eligible for an Approved site registration status (assuming the study is still active). If the study is closed and therefore the site registration status is Closed, the DTL PSR will be complied, but the site registration status will not change.

Canadian Sites and DTLs

The DTL process for Canadian sites differs depending upon whether the Canadian Cancer Trials Group (CCTG) is a study participant and holds the Clinical Trial Agreement (CTA) in Canada.

In cases when CCTG is a participant on the study and holds the CTA in Canada, Canadian sites must participate on studies under CCTG. In this situation, Canadian sites complete their DTLs in the Roster Interface Program and Participants List Environment (RIPPLE), an application on the CCTG website. RIPPLE is integrated with the CTSU DTL application, and DTLs from RIPPLE are viewable on the CTSU DTL application once approved in RIPPLE. Canadian sites are not able to edit these DTLs within the CTSU DTL application and instead must make updates directly in RIPPLE.

For studies on which CCTG is not a participant, CCTG does not hold the CTA, or a CTA is not required, Canadian sites (i.e., those who are members of the U.S.-based groups) will create and manage their DTLs within the CTSU DTL application.


Post Date: 25-Feb-2025