Managing Task Assignments
Introduction
For DTLs in an Initiated, Awaiting CI Approval, Approved, or Unapproved status there are multiple methods for making or modifying task assignments. The method that works best for you will depend on whether you need to manage just one or two DTLs or multiple DTLs with a lot of redundancy between sites and protocols. Note that task assignments cannot be modified on DTLs in a Retiring or Retired status.
Anybody at a site can manage tasks for a DTL in an Initiated status. However, once a DTL has been submitted for approval and has a status of Awaiting CI Approval or has been signed and has a status of Approved or Unapproved, tasks can only be managed by the named DTL Administrator (DTLA) or Clinical Investigator (CI).
Please visit the DTL and Task Status Definitions and Status Reasons Help Topic for an overview of task status reasons and how to address them; this may be especially helpful when you encounter tasks in a Pending status and aren’t sure how to resolve them.
Jump to one of the following sections for instructions:
Managing Tasks for an Individual DTL
Managing Tasks in the Task Assignment Browser
Managing Tasks Across Multiple DTLs
Manage Tasks Cart Functionality
Managing Tasks with Training Requirements
Managing Tasks on a Targeted Radiopharmaceutical Facility (TRF) Roster
Task Status Overview
DTL Summary Report
Managing Tasks for an Individual DTL
- Access the Site DTL Browser via the Site DTL menu at the top of the screen or via the View/Manage Single DTL Quick Link in the Dashboard (see Figures 1 and 2).
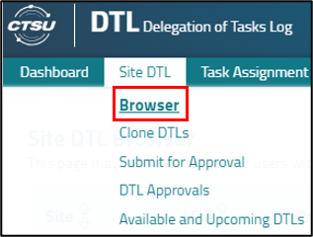
Figure 1: Site DTL Browser menu item.
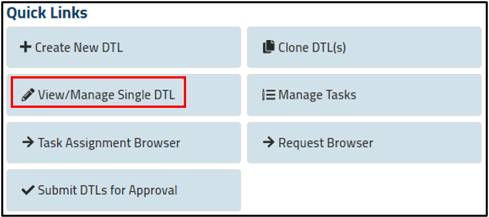
Figure 2: View/Manage Single DTL Quick Link.
- Use filters if needed to locate the correct DTL and click the View DTL
 icon in the Action column on the right.
- To add a new task assignment, click on the + Assign Task
 button in the upper right corner. Complete the fields to add the individual to available tasks (see Figure 3).

Figure 3: Add new task assignment fields.
- Select the Assignee Database you want to use. The system will default to the Rostered Users option; this option will allow you to select anybody who is on the roster at the site in question (or, when applicable, the roster of an associated Provider). The alternative, Global Users, will allow you to search for and select anybody with an Active CTEP account within the entire system; they do not need to be rostered at your site. (Note that most, but not all tasks require the assignee to be on the site roster.)
- Select the Assignee you want to assign the task(s) to. You can select from the rostered users list or do the global search by Last Name, First Name, and/or CTEP Identifier (ID).
- Select the task(s) you want to assign from those listed in the Possible Task(s) for Assignment section or check the Select All box. Any task assignments the assignee already holds will be in the Already Assigned Task(s) section, while those that are not possible to be assigned will appear in the Task(s) Unavailable to be Assigned section.
- Be sure to save the task assignment using the Save
 icon.
icon.
- To modify an existing task assignment, use the filters on the individual DTL’s Task Assignments page to locate the individual(s) and task(s) that need to be modified.
- Use the Reassign
 and Inactivate
  icons under the Action column to reassign or remove task assignments.
- If reassigning a task, a popup will display that describes the action and allows you to select the new assignee (see Figure 4). Complete the required fields and click the Reassign button to complete the reassignment.
- If inactivating an assignment, a popup will display to confirm the action. Select Confirm to continue.
- Note that inactivated tasks are not truly deleted from the system. They will be removed from your default views but will remain in the DTL’s audit history and can be viewed by filtering for Inactive tasks in the Status column.
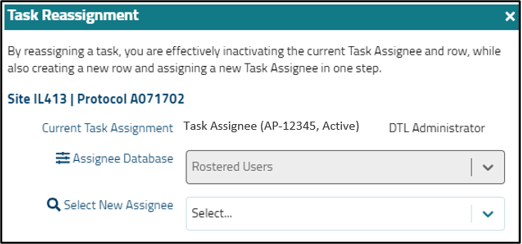
Figure 4: Task Reassignment popup.
- If the new task assignments require CI signature, the task assignment will have a status of Awaiting CI Approval and the DTL will be included in the bi-monthly signing notification to the CI. If you would like to notify the CI immediately use the Notify CI
 button above the right side of the grid. Tasks requiring signature are not active until signed.
Managing Tasks in the Task Assignment Browser
- Navigate to the Task Assignment Browser using the menu at the top of the screen or the Task Assignment Browser Quick Link in the Dashboard (see Figures 5 and 6).
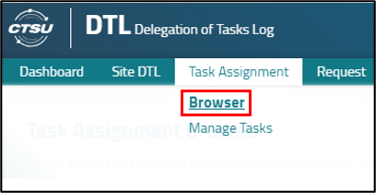
Figure 5: Task Assignment Browser menu item.
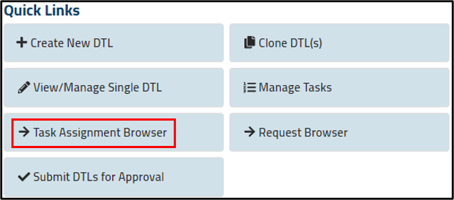
Figure 6: Task Assignment Browser Quick Link.
- Filter for the appropriate individual, task assignment, site, and/or protocol to locate the task assignments that you wish to reassign or inactivate.
- Use the Reassign and Inactivate (delete) icons under the Action column to reassign or remove task assignments as described in Step 4 of the Managing Tasks for an Individual DTL section.
Managing Tasks Across Multiple DTLs
This section describes how you can either assign or inactivate tasks for assignees across DTLs. The application walks you through a progression of steps for either activity, and cart functionality allows you to complete the operation for multiple people before submitting the entire request for processing.
- Begin the process by selecting Manage Tasks from the Task Assignment menu at the top of the screen, or via the Manage Tasks Quick Link in the Dashboard (see Figures 7 and 8).

Figure 7: Manage Tasks menu item.
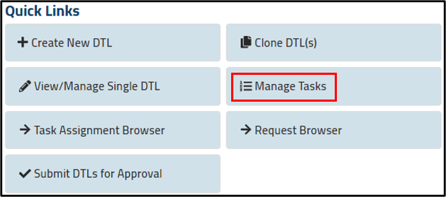
Figure 8: Manage Tasks Quick Link.
- Select the operation, Assign Task(s) by Person or Inactivate Task(s) by Person (see Figure 9).
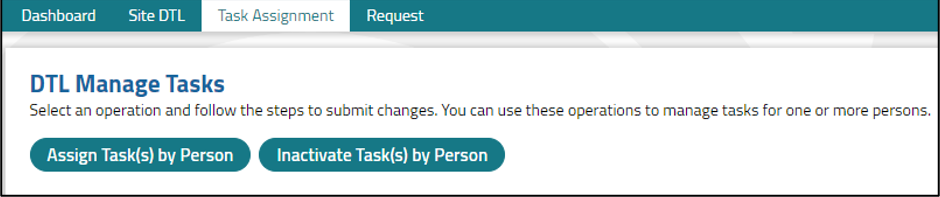
Figure 9: DTL Manage Tasks options.
A. Assign Task(s) To A Person Across Multiple DTLs:
Step 1: Select Person
- Search for the individual you would like to assign tasks by full or partial Last Name, First Name, and/or CTEP ID.
- Dependent on your search criteria, multiple matches may display. Use the scroll bar on the right to review the list of matches.
- Make a selection by clicking on the correct individual in the options list.
- You may view the selected individual’s current assignments by clicking on the View Person’s Task Assignments link in the section header.
- Once you select a person, they will appear in the section heading for easy reference during later steps (see Figure 10). The Next button will be enabled, click to proceed to the next step.

Figure 10: Assign Task(s) by Person – Select person section.
Step 2: Select DTLs
The Step 2 grid (see Figure 11) will display all DTLs in an Approved, Unapproved, or Awaiting CI status for which you are the DTLA or CI and all initiated DTLs at sites at which you are active on the Lead Protocol Organization (LPO) or Participating Organization (PO) roster. It will not display retiring or retired DTLs, nor DTLs controlled in the Canadian Cancer Trials Group’s (CCTG) Roster Interface Program and Participants List Environment (RIPPLE) application.

Figure 11: Assign Task(s) by Person – Select DTLs grid.
- Search for the DTLs that you would like to assign tasks on.
- You may filter for Site, Protocol, or DTL status, sort the columns in the grid, or use the page controls to view the DTLs.
- Click the Select All DTL(s) box to select all available DTLs or select individual DTLs (you may select multiple DTLs). As you select DTLs, the number selected will appear in the section header for easy reference.
- If needed, use the Previous button to go back to Step 1.
- Once you have selected the DTLs, click on the Next button.
Step 3: Select Task(s)
The Step 3 grid will display the tasks available to assign the individual selected in Step 1; only tasks that are applicable to any of the DTLs selected in Step 2 and are allowed for the individual’s registration type (e.g., Associate, Associate Plus, Investigator) will be available (see Figure 12).

Figure 12: Assign Task(s) by Person – Select tasks grid.
- Select the tasks you would like to assign by using the Select All Task(s) option or selecting a single or multiple relevant tasks.
- Under the Applicable Protocols column, ALL will display if the task is on all selected DTLs (i.e., is one of the 12 standard tasks); otherwise, the protocol number(s) will display if the task assignment is limited to a subset of the selected DTLs (i.e., non-standard tasks that are on only certain DTL templates; see several examples in Figure 12, including the Authorized User tasks, Pathology Lab Support, and Primary Study/Site Contact).
- The training icon
 will appear for a task if it requires training on at least one of the selected DTLs. (Note that the DTLs with the training requirement will not be called out in the Applicable Protocols column, even if the training only applies to the task for some of the selected protocols).
- If you have questions about task assignment definitions or criteria, you can view the DTL Master Task List by clicking on the link in the section header.
- Once you have selected at least one task, the Add Tasks to Cart button will be enabled and will show the total number of task assignments selected (see Figure 13). Click the button to move your selections to the cart.

Figure 13: Enabled Add Tasks to Cart button.
Step 4 (Optional): Repeat If Necessary
You can go through the three steps to assign tasks to additional individuals, one at a time. Just add each person’s assignments to your cart and go back to Step 1 and repeat.
Step 5: Review and Submit Entire Request
Jump ahead to Manage Tasks Cart Functionality to review the remainder of the process.
B. Inactivate a Person’s Task(s) Across Multiple DTLs:
Step 1: Select Person
- Search for the individual whose tasks you would like to inactivate by full or partial Last Name, First Name, and/or CTEP ID.
- Only individuals who hold task assignments on DTLs that you are allowed to act on will be available for selection.
- Make a selection by clicking on the correct individual in the options list.
- You may view the selected individual’s current assignments by clicking on the View Person’s Task Assignments link in the section header.
- Once you select a person, they will appear in the section heading for easy reference during later steps (see Figure 14). The Next button should be enabled, click to proceed to the next step.

Figure 14: Step 1 to Inactivate Tasks by Person – Select Person section.
Step 2: Select Task Assignment(s)
The Step 2 grid (see Figure 15) will display tasks assignments that are in Pending, Active, or Awaiting CI Approval on DTLs in an Approved, Unapproved, or Awaiting CI status for which you are the DTLA or CI. It will also display their tasks on all Initiated DTLs at sites at which you are active on the LPO or PO roster. It will not display inactive task assignments or those on retiring or retired DTLs, nor DTLs controlled in CCTG’s RIPPLE application.

Figure 15: Inactivate Task(s) by Person – Select Task Assignments.
- Use the Select All box or select individual Task Assignment records (you may select multiple).
- Use the page controls and/or the scroll bar on the right to scroll through the list of Task Assignment records.
- Use the filter to narrow down the selection criteria by site, protocol, task assignment, or DTL status.
- Once you have selected at least one task, the Add Inactivations Tasks to Cart button will be enabled and will show the total number of task inactivations requested (see Figure 16). Click the button to move all your selections to the cart.

Figure 16: Enabled Add Inactivations to Cart button.
Step 3 (Optional): Repeat If Necessary
You can go through the two steps for additional individuals, one at a time. Just add each person’s task inactivations to your cart and go back to Step 1 and repeat.
Step 4: Review and Submit Entire Request
Proceed to Manage Tasks Cart Functionality in the next section to review the remainder of the process.
Manage Tasks Cart Functionality
Whether assigning tasks or inactivating tasks, once you add them to the cart, they will appear fully expanded in the cart (see Figure 17).
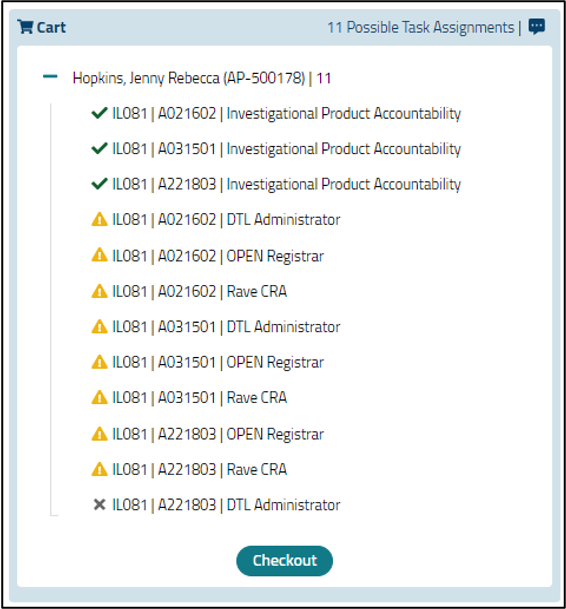
Figure 17: Manage Tasks cart.
Cart features:
- If there are multiple persons in the cart, the newest addition will always appear at the top.
- You can collapse and expand a person’s record using the – and + icons to the left of their name.
- Icons indicate the ability of the system to process the task assignments or inactivations. There are three possibilities for task assignments, and two for task inactivations. Note that hovering your mouse over the icon for each individual item will bring up a tool tip that provides more information.
- A green check
 indicates no warnings, i.e., the assignment/inactivation can be processed.
- A yellow exclamation point
 indicates a warning; the system will process the assignment/inactivation, but there is something to note.
- In the case of task assignments, the common reasons for a warning are the person not being on the site roster or not holding the necessary corresponding role on the roster, or the task requires training that has not been completed. The assignment will be made but will remain in Pending status until the issue(s) is resolved.
- In the case of task inactivation, the only reason for a warning is that removing the task assignment will cause the DTL to go to unapproved, i.e., if you inactivate the only assignee for a particular task so that the minimum requirement is no longer satisfied. The inactivation will be processed, but the site DTL will go to unapproved until the task is assigned to at least one person.
- A grey x
 indicates that a task assignment cannot be processed. This will happen when the maximum number of assignees for the task has already been met (e.g., trying to add a fourth DTLA when the maximum is three), when a given task is not applicable to a certain DTL (e.g., for a non-standard task), when the person already holds the task on the selected DTL, and when the person is not in active or follow-up status on the linked Provider roster.
- The number of possible task assignments or inactivations for an individual is noted next to their name; the grand total for the cart (if it contains multiple persons) will be in the cart header.
- There are delete
 icons available at the person level and the task level (if you hover over the task or person name).
- Clicking on the View Additional Details
 icon will display a popup with the cart items displayed in a table. Each assignment or inactivation will have its own row, and you can view and filter for Person, Site, Protocol, Task Name, and Pre-validation Details (see Figure 18).

Figure 18: Cart Details popup.
- Once you are satisfied with the contents of your cart, click the Checkout button to submit the request. You will receive a Checkout Alerts/confirmation popup (see Figure 19).
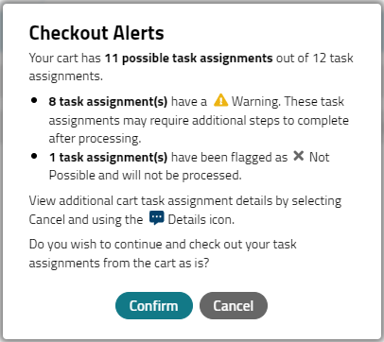
Figure 19: Checkout Alerts popup.
- Click on the Confirm button and the request will be submitted for processing (please note that if you do not click on Confirm, the system will not process any changes and the cart contents will be abandoned and lost). Upon confirmation you will be taken to a Confirmation screen (see Figure 20).

Figure 20: Assign Task(s) by Person confirmation screen.
- Click the View Requests link to navigate to the Request Browser. All requests will display in the grid.
- Click the Go to Select Task Operation link to navigate to the DTL Manage Tasks screen to start another operation.
- Click the Go to Task Assignment Browser link to navigate to that screen with default filters set.
- Click the Request Browser link within the body of the message to view the progress of this individual request, as well as details about the request.
- Note: See the Help Topic Request Browser Overview for more information about the Request Browser.
Managing Tasks with Training Requirements
Tasks with an associated training requirement are indicated in various DTL screens by a certificate icon (see Figure 21). This icon is actionable in the Manage Site DTL and Task Assignment Browser screens. It is informational only in the Manage Tasks Assign Task(s) by Person screen (step 3) and the Task Status Overview popup.

Figure 21. Task Assignments with training requirement.
Training must be completed before a task assignment can get to a status of Active or Awaiting CI Approval; until then, an assignment will remain in Pending status with a status reason of Required training not complete (see Figure 22).

Figure 22. Pending task assignment with required training not complete.
DTL-related training is generally managed via the Compliance, Learning, and SOP Solutions (CLASS) application, the learning management system supported by the CTSU. An integration between CLASS and the DTL application provides several benefits, including:
- A view within the DTL of the title of the training course required for a particular task assignment as well as each individual assignee’s status with respect to training.
- In most cases, automatic assignment of training when somebody is assigned the task within the DTL.
- Automated communication of training completion from CLASS to the DTL application (please allow up to four hours for this to take place). There is no need for users to upload or submit a training certificate.
- If an assignee who has completed a particular training requirement is subsequently assigned a task on a different DTL with the exact same training requirement, an automated system check will confirm they have already completed the training; they will not need to repeat it.
Any DTL user can click on the certificate icon within the Manage Site DTL screen or the Task Assignment Browser screen and see the training course name as well as the training status for the individual assignee (see Figure 23).
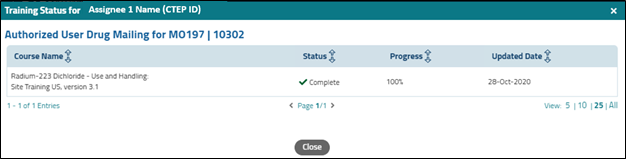
Figure 23. Training status popup for individual task assignment.
Task assignees who are assigned DTL-related training can access the training in CLASS via several methods:
- Use the link included in the email received when enrolled in the course (this will come from CLASSHelpDesk@westat.com).
- Directly at https://classlms.org. Once logged in, look under the My Courses tile on the dashboard to locate the course.
- Via the CLASS page on the CTSU members website.
- Click on Connect to the CLASS Website on the general CLASS page and then locate the course as noted above.
- Go to the My Courses section and link over to the course by clicking on the course title within the grid.
Managing Tasks on a Targeted Radiopharmaceutical Facility (TRF) Roster
For studies with radiopharmaceutical agents, the following steps must be completed to allow an enrolling site to assign the Authorized User Prescribing (minimum of one Investigator [IVR] assigned), Authorized User Drug Mailing (minimum of two persons assigned with an Associate Plus [AP] level or higher), and Authorized User for Medical Use tasks on the DTL:
- The TRF must submit their Radiation Materials License (RML) and Site User List to identify the authorized users that are participating on the protocol to the Pharmaceutical Management Branch (PMB)/CTEP at NCIPMBTRFDOCS@NIH.gov. When submitting the documents use the subject line: NCI Protocol [protocol number] RML or NCI Protocol [protocol number] Site User List respectively. Important Note: Allow at least two weeks for abstraction of licensure and TRF person information.
- PMB will review the license and Site User List, create the TRF record, and abstract credentials for the TRF and persons listed on the documentation.
- A person at the enrolling site with a primary role on the appropriate roster must align the enrolling site to the TRF using the Provider Association feature under the Regulatory link on the CTSU members' website. (Note that this step cannot be done until steps 1 and 2 are complete.)
- Persons on the TRF roster credentialed for the agent will be invited to a course in the Compliance, Learning, and Standard Operating Procedures Solutions (CLASS) system depending on the study requirements. They will receive an email with instructions on accessing the system and taking the training.
- Once rostered with the TRF, the individuals can be assigned the Authorized User tasks on the site DTL. Their assignments will remain in Pending status until they complete the assigned CLASS training.
- Individuals associated with the TRF will have the TRF CTEP identifier noted in brackets next to their name (e.g., Jane Doe [TRF-0005] (AP-12345)). Individuals on the TRF roster cannot hold enrolling site tasks unless they are also on the enrolling site roster.
- Individuals who are on the TRF roster but have not been credentialed by PMB for the agent in question will not be invited to the training; their training status for the associated course will remain at Enrollment Pending and the Authorized User task assignments will also remain in Pending and will not be approvable.
- Individuals associated with the TRF will have the TRF CTEP identifier noted in brackets next to their name (e.g., Jane Doe [TRF-0005] (AP-12345)). Individuals on the TRF roster cannot hold enrolling site tasks unless they are also on the enrolling site roster.
- Once credentialed persons on the TRF roster complete their agent-specific training in CLASS, an integration will mark the training as complete in the DTL application, there is no need to upload a training certificate. Assuming all other requirements are met, the Authorized User tasks will go to a status of Awaiting CI Approval and can be signed off by the CI.
Note: TRF requirements may vary across agents and protocols. The above instructions are a general guide but do not replace the protocol document for protocol-specific instructions.
Task Status Overview
To view the status of task assignments for a given DTL, select the Task Status Overview  icon from within an individual Manage Site DTL screen. A popup will display all the tasks on the DTL template, whether they are required or optional, the minimum requirement for each task, if the task requires training, and how many people have been assigned each task. A status column will indicate if any of the assignees have a pending assignment for that task.
Figure 24 shows a Task Status Overview popup. In this example, the DTL has 15 tasks, 14 of which are required. Three of the tasks require training, indicated by the certificate icon. The site still needs to assign at least one person each to the OPEN Registrar and Rave CRA tasks. The assignee(s) for those tasks are pending for some reason, and they do not count towards satisfying the minimum requirement.
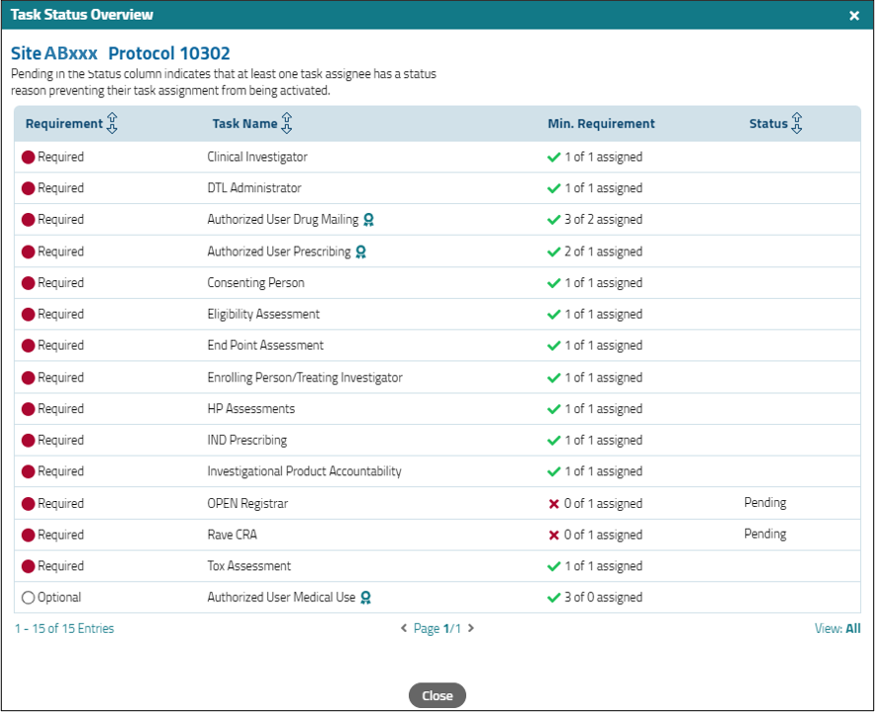
Figure 24: Task Status Overview.
If you would like a reminder regarding the study-specific template task list, including required registration types, the names of any required training, etc., use the Template Information link in the upper right corner of the popup to view this information at the template level (see Figure 25). Select Task Status Overview to go back to the status of the task assignments at your site, and Close to close the popup.
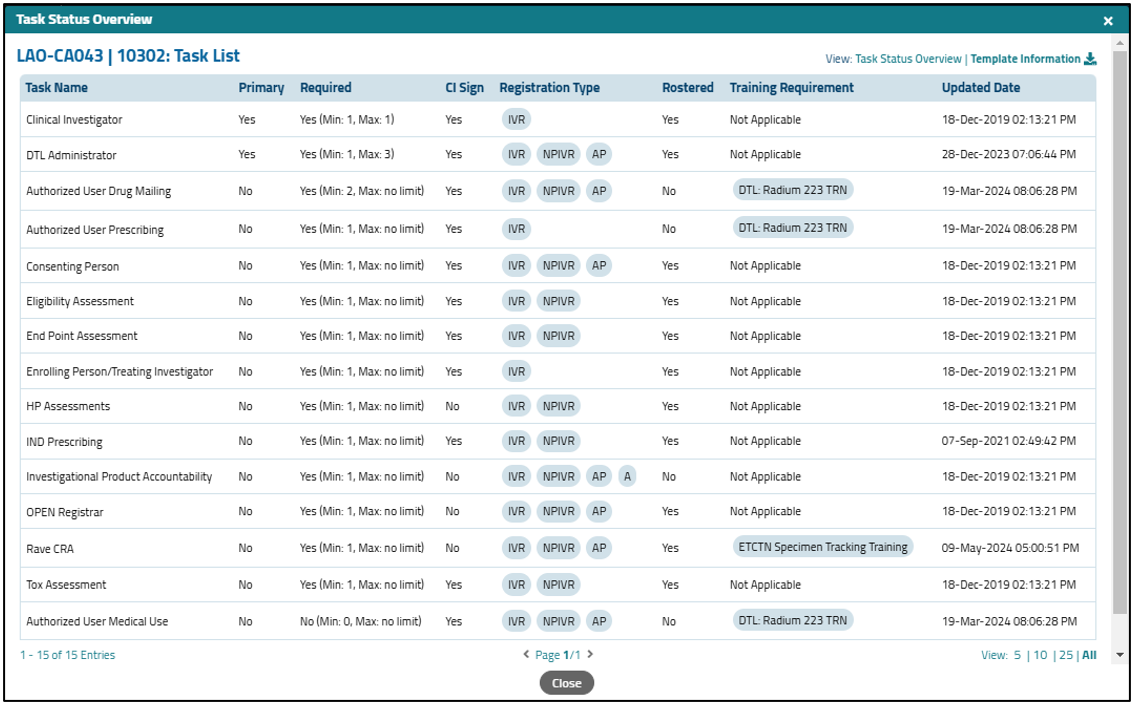
Figure 25: Template Information.
DTL Summary Report
The DTL Summary Report can be accessed from the Site DTL Browser or an individual site DTL screen by clicking on the Generate DTL Summary Report  icon and is viewable by any user with access to a given DTL. It is an Excel spreadsheet that displays task assignments over the life of the DTL, including across template revisions if there is more than one. The default is to display all data since the DTL’s initial approval, but date parameters can be set to narrow the timeframe. The report includes all assignments that were ever active, including those that have since been end-dated, so includes staff members who are no longer on the DTL. The report also shows all the approvals/signings, as well as any times when the DTL was unapproved or retired. It is a great tool for site auditors and anybody else who wants to see the entire history of a site DTL in one place. (See Figure 26 for an example.)
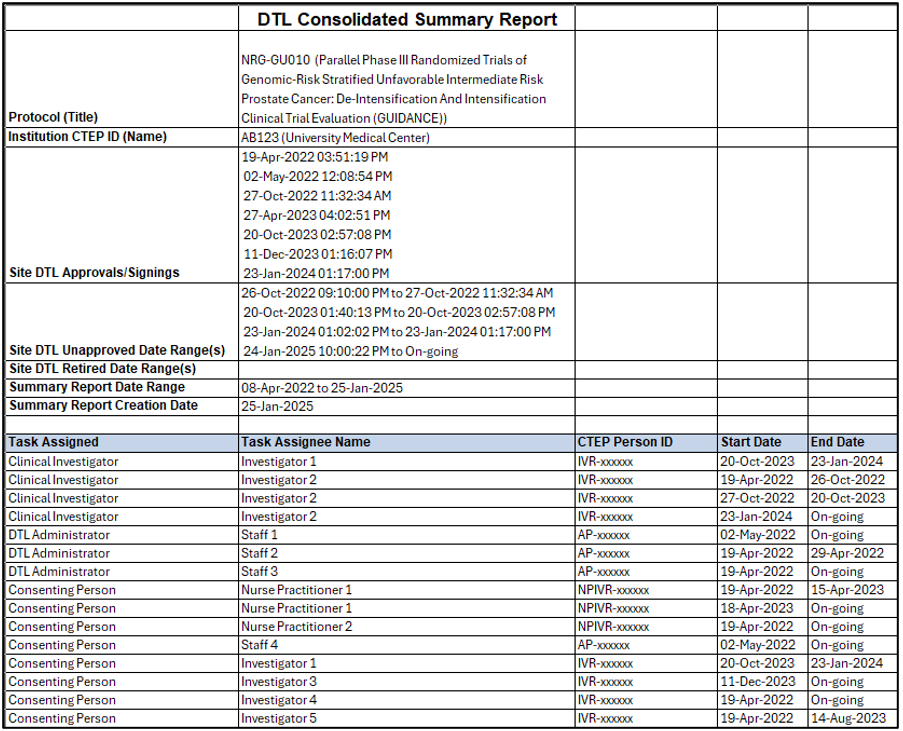
Figure 26: DTL Summary Report.
Post Date: 25-Feb-2025