Oncology Patient Enrollment Network Portal
Site User Guide
September 15, 2009
Logging into the OPEN Application Using the OPEN URL
Logging into OPEN via the CTSU Members Web Site
Completing the Demography Screen
Completing the Eligibility Checklist
Submitting the Eligibility Checklist
Completing a Multiple Step Registration
In Progress Registration Status
Query Registration Information
Site Registrations Search (RSS)
Performing a Practice Registration
Figure 6: Create New with the Express Courier section
Figure 7: Initialize Registration
Figure 8: Registration Initialized
Figure 9: Selected Registration Information
Figure 11: Save & Validate Messages
Figure 13: Save & Validate Messages
Figure 16: Resubmit a Registration
Figure 17: Old Registration Resubmission Warning
Figure 18: Successful Resubmit
Figure 20: Copy Details Confirmation
Figure 22: History Registrations
Figure 23: In Progress Registrations
Figure 25: In Progress Registration Search Screen
Figure 27: Validation Errors on Eligibility Checklist
Figure 31: Site Registrations Browser
Figure 33: Report Criteria Entry
Figure 34: Start Practice button
Figure 35: Application in Test Mode
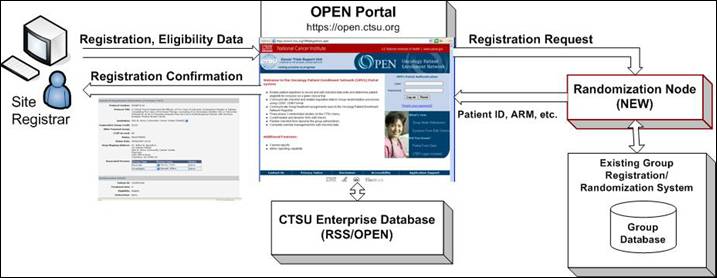
The OPEN portal provides a centralized system which allows patient registrars to register patients to various clinical trials using a uniform web-based interface.
The OPEN portal application system:
Enables patient registrars to enter eligibility checklist data and determine patient eligibility for inclusion on a given clinical trial.
Communicates eligibility checklist and related regulatory data to Group randomization system(s) using industry standards: XML and CDISC schema.
Communicates Group registration output data such as treatment assignment, patient ID, and registration notes back to the OPEN portal user.
The OPEN Portal application is used to register patients on NCI-sponsored clinical trials that have been activated within the system.
|
Minimum System Requirements |
|
|
Computer/Processor |
Computer with a 233MHz processor or higher (Pentium processor recommended) |
|
Operating System |
Windows XP, Windows Vista |
|
Memory |
128 MB of RAM minimum |
|
Display |
Super VGA (1024 x 768) or higher-resolution monitor with 256 colors |
|
Application |
URL |
|
OPEN Portal |
|
|
CTSU members website |
|
The OPEN Portal business process is shown in the following diagram:
All persons accessing OPEN must have an active CTEP-IAM account, and maintain the account via the policies outlined by CTEP. Please see the Guidelines for OPEN Access and Crediting for more information.
There are two ways to access the OPEN Application: by using the OPEN URL, or by going through the CTSU Members’ web site.
Both methods are described below.
To log into the OPEN Portal application directly:
1. Launch a new internet window.
2. Type in the URL for OPEN Portal located in the URLs section.
3. The Log-in screen will be displayed and the User ID and password is requested.
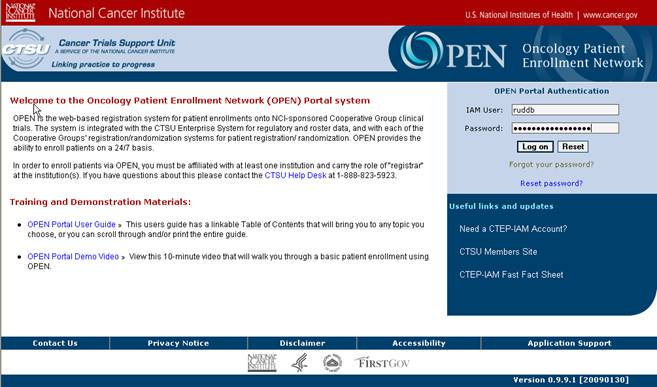
Figure 1: Log On Screen
4. Enter your CTEP-IAM username in the IAM User field and your associated password in the password field (these are the same username and password you use to enter the CTSU members’ web site).
5. Press the “Log on” button to enter the system
Or
6. Press the “Reset” button to clear the entered fields.
The Log on button will validate the entered IAM ID and password and allow you to enter the OPEN portal application. The welcome screen will be displayed, as shown in Figure 2 below.
If the IAM ID and password entered is invalid OPEN will return the message “Invalid username or password”. The user is able to re-enter the IAM username and password.
If you have additional problems logging into the OPEN application please contact the CTSU Help desk for assistance at 1-888-823-5923.
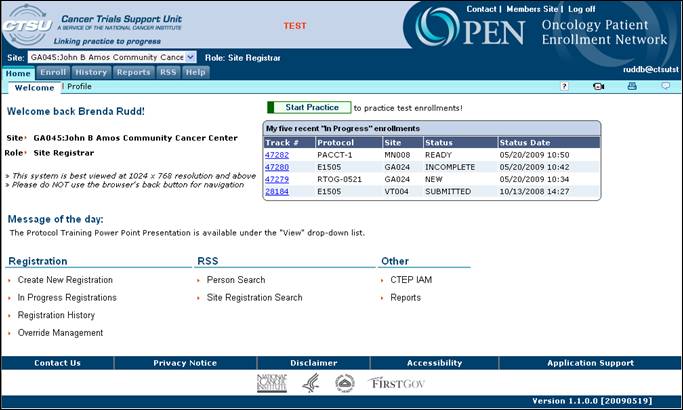
Figure 2: Welcome Tab
You can also log into the OPEN Portal application via the CTSU members’ web site.
1. Open a new internet window.
2. Log into the CTSU members web site (see the URLs section).
3. Go to and click on the tab labeled “OPEN”. This tab will display information specific to OPEN and provide a link to enter the OPEN application.
4. Press the “OPEN” button. The OPEN application will launch displaying the welcome tab as shown in Figure 2 above.
The profile section displays information associated with the CTEP-IAM ID of the person who is logged into the OPEN system. All existing data associated with the user’s CTEP-IAM Account will be displayed, if there is no data for that listing it will be blank.
1. Login to the OPEN application.
2. Click on the Profile tab.
The following fields are displayed in the profile section:
· Last Name
· First Name
· RSS Role
· Person Type
· Account Name
· Account Status
· Status Date
· Registration Expiry Days
· Password Expiry Days
· CTEP ID
· CTEP Investigator ID
· CTEP Title
· HSP Certification
· HSP Certification Type
· HSP Certification Date
You are able to reset your password while logged into the OPEN application. Please note: Resetting your password in OPEN will update your password associated with your CTEP-IAM account ID, thus changing the password for all systems that use your CTEP-IAM Account ID (e.g., the CTSU members’ web site).
1. Login to the OPEN application.
2. Click on the Profile tab.
3. Click on the “Reset Password” button
4. Verify the pre-populated User Name is accurate
5. Enter your current password
6. Enter your desired password according to the password rules presented on the screen.
7. Confirm your password
8. Click on the submit Button
The Enroll tab gives you multiple ways of controlling the registration of a patient. In this section you will be able to create a new registration. For creating ‘practice’ registrations please see the “Performing a Practice Registration” section of this document.
1. Log into the OPEN application.
2. Verify the site and role displayed.
![]()
Figure 3: Site and Role
If you are affiliated with more than one site or have multiple roles within a site, and wish to create a registration for a site or role different from what is displayed, a drop down list will be shown (Figure 4). Use the drop down list to select a new site and role type. Only sites with which you are affiliated will be included in the drop down lists.

Figure 4: Site and Role
Click on the “Create New Registration” link on the welcome page or click on the Enroll tab and press the ‘Create New’ option. This will allow you to complete the preliminary steps of the registration process. 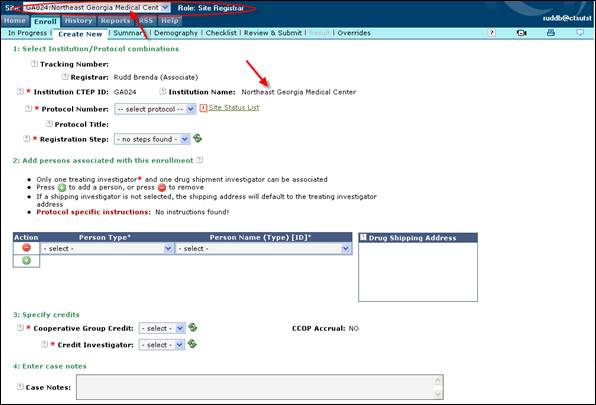
Figure 5: Create New Tab
3. The site name that is displayed or selected on the welcome page will automatically populate the institution field as shown in Figure 5. If you choose to change the site from this page, you will be redirected to the welcome screen and will need to begin the registration process again.
4. Select the protocol number that the patient will be registered to. Only the protocols approved for the institution chosen in the previous steps will be listed. This is a mandatory field and must be populated.
*** If an institution or protocol number is not listed that you believe should be listed please contact the CTSU Help desk for assistance at 1-888-823-5923.
5. Click on the “Site Status List” link to receive details on each of the protocols that are associated with the selected institution.
6. Select the registration step from the drop down list.
7. Select the person type and the person name associated with this enrollment. These options will depend on the protocol selected in step 4 above. The person types that you see depend upon what rules are set up by the Lead Organization.
8. When a Treating Investigator or a Drug Shipment Investigator is selected the address where the drugs will be shipped will populate the Shipping Address section of this form. The address will default to the treating investigator if no drug shipment investigator is provided. However, if a drug shipment investigator is added, that individual’s address will populate the address field.
9. To add multiple associated people to the registration, press the ![]() button. A new row will be displayed. Press the
button. A new row will be displayed. Press the ![]() button to delete a row.
button to delete a row.
10. Select a Cooperative Group from the “Cooperative Group Credit” drop down list. This is the Cooperative Group that will be credited with the enrollment. This is a mandatory field and must be populated.
11. The Treating Investigator selected in step 8 will automatically populate the “Credit Investigator” field once a crediting group has been selected. If the treating investigator is not a member of the crediting group, then the treating investigator will not pre-populate and you must select a Credit Investigator from the “Credit Investigator” drop down. This is a mandatory field and must be populated.
12. The CCOP Accrual will be automatically determined.
13. Any additional details can be entered in the case notes box. This information will also be displayed in the registration summary. This field is optional for site use only. The information entered here is not submitted to the Lead Organization with the enrollment data.
14. The “Express Courier Information for Drug Shipment” section will appear as section 4 of the Create New screen if deemed Mandatory or Optional by the Lead Organization (as seen in Figure 6 below). If this section is deemed not required it will not appear on your create new screen (as seen is Figure 5 above).
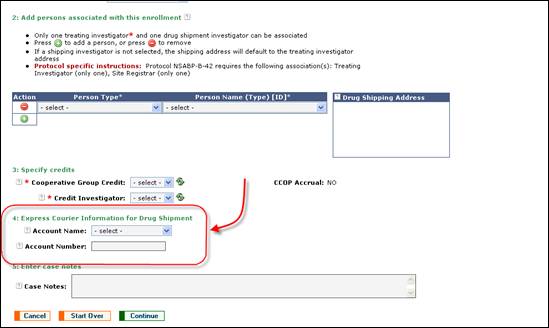
Figure 6: Create New with the Express Courier section
15. Press the ‘Continue’ button to proceed to the next step. When the ‘Continue’ button is pressed you will receive a pop up message and asked to confirm the registration initialization (as seen in Figure 7).
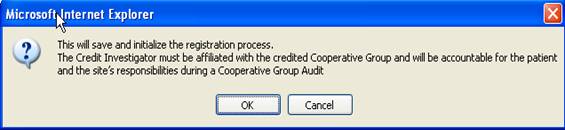
Figure 7: Initialize Registration
16. Press ‘OK’ to initialize the first half of the registration and add a listing to the Enroll à In Progress screen (see the In Progress section for details). You will then be taken to the next step in the registration process.
Once the registration is initialized you will be supplied with the tracking number that can be used to track a registration in the OPEN Portal application and the option to:
1. Edit the Registration – clicking on the “Edit Summary” button will redirect you to the “Create New” screen and you will be able to edit the registration as desired.
2. View the summary of the registration - clicking on the “View Summary” button will redirect you to the summary screen.
3. Continue this registration – This option will display the next step for the selected protocol
Figure 8: Registration Initialized
The Summary, Demography and Checklist Form options can also be initiated from the second row of tabs located at the top of the screen.
17. Once a registration is initiated and a tracking number is assigned, the identifying registration information will be displayed in the header, as shown in Figure 9. To get additional information click on the ‘Details’ or ‘Summary’ links.
![]()
Figure 9: Selected Registration Information
The Demography screen will display the demography form that is associated with the study you selected in the first section of the registration process. Completing the demography form is mandatory, and will advance you to the eligibility checklist form which will complete the registration process.
1. Open the demography screen by pressing the “Demography” tab. (If the first section of the registration has not been completed follow the steps in the “Creating a New Registration” section.)
2. Once the demography screen is displayed you can enter the patient demography data per the requirements of the protocol.
OR
3. If you have an existing patient ID you can enter the patient ID in the “Existing Patient ID” field and press the associated “Populate Data” button, the demography screen will automatically populate. This will be available only in protocols where the associated Lead Organization support pre-filling the demography data.
4. The system will return a validation error if any of the data on the form is invalid or incomplete.
Examples of errors that could be included are:
· Mandatory fields that are not completed.
· Dates that are not within a required period of time.
· Fields that are inconsistent with another.
· Fields that do not match eligibility requirements.
Each protocol can have different error checks. These will be determined by the administrators of that protocol and eligibility checklist.
5. There are multiple ways to save your registration, you can:
a. Press the ‘Save’ button
You will be able to save the demography screen data at any stage. You will receive a message verifying that the data has been saved.
A registration that has not been submitted will be stored in the system for no more than 5 calendar days from the time it was last saved. After 5 calendar days the registration will be deleted and it will need to be re-entered. The system will remind the user of this time limitation at the time the data is saved.

Figure 10: Save Alert Message
Or
b. Press the ‘Save & Validate’ button
The Save & Validate button will save the demography screen data at any stage but it will also review the data for any validation errors; however your data will still be saved even if there are validation errors.
Errors will be presented in the module where the error occurred. To quickly view any errors you can expand and collapse all modules by clicking on the “Expand/Collapse all Modules” link. This will bring you directly to the module in the checklist that contains the error.
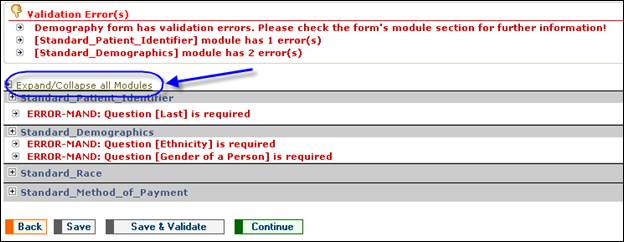
Figure 11: Save & Validate Messages
6. Once the demography screen is completed press the “Continue” button to proceed to the eligibility checklist.
The Checklist tab will display the eligibility checklist form that is associated with the study you selected in the first section of the registration process. Completing and submitting the Checklist Form will complete the final section in the registration process.
1. Open the eligibility checklist. (If the first two sections of the registration have not been completed follow the steps in the “Creating a New Registration” and “Completing the Demography Screen” sections.)
2. Once the checklist form is displayed you are responsible for entering the patient data per the requirements of the protocol.
3. The system will return a validation error if any of the data on the form is invalid or incomplete.
Examples of errors that could be included are:
· Mandatory fields that are not completed.
· Dates that are not within a required period of time.
· Fields that contains data which are inconsistent with the data in another field.
· Fields that do not match eligibility requirements.
Each protocol can have different error checks. These will be determined by the administrators of that protocol and eligibility checklist.
4. There are multiple ways to save your registration, you can:
a. Press the ‘Save’ button
You will be able to save the eligibility checklist at any stage. You will receive a message verifying that the data has been saved. The checklist will be retrievable from the Enroll -> In Progress tab.
A registration that is not submitted and registered will be stored in the system for no more than 5 calendar days from the time it is last saved. After 5 calendar days the registration will be deleted and it will need to be re-entered. The system will remind the user of this time limitation at the time the data is saved.
Figure 12: Save Alert Message
Or
b. Press the ‘Save & Validate’ button
The Save & Validate button will save the eligibility checklist at any stage but it will also review the eligibility checklist for any validation errors; however your data will still be saved even if there are validation errors.
Errors will be presented in the module that the error occurred. To quickly view any errors you can expand and collapse all modules by clicking on the “Expand/Collapse all Modules” link. This will bring you directly to the module in the checklist that contains the error.

Figure 13: Save & Validate Messages
The checklist will be retrievable from the Enroll -> In Progress tab by selecting the desired registration and clicking on the “Eligibility Checklist” button.
The user is able to submit the eligibility checklist to the Lead Group for approval.
1. Complete the eligibility checklist.
2. Press the Continue button on the eligibility checklist. .
![]()
Figure 14: EC Submit
3. The eligibility checklist is checked for any validation errors. If validation errors are found you must fix the errors or request and receive an override in order to continue (for more details see the “Request an Override” section). You may also receive alert messages. Alert messages are only used to convey information to the user; therefore the Eligibility Checklist can be submitted with alert messages present.
4. If no validation errors are found you will be given a synopsis of the data entered into the eligibility checklist and asked to confirm the submission.
5. If changes are necessary hit the Demography sub-tab or the Checklist sub-tab to return to the desired form, this will allow you to update entered data as desired.
6. If no changes are needed press the “Submit” button on this screen.
7. Click on the “OK” button to submit the form to the Lead Organization.
8. The Eligibility Checklist is then submitted to the Lead Organization. A confirmation of the registration and details will be displayed. This will include the Patient ID, Treatment Arm and Site Instructions, if any.
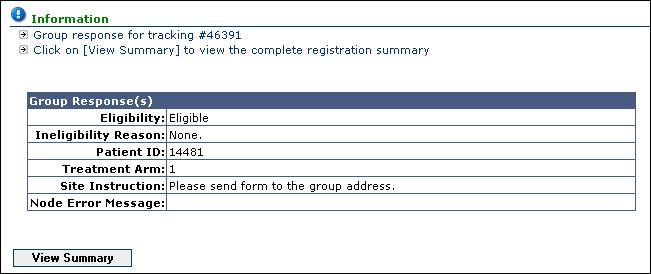
Figure 15: Confirmation
9. Click on the View Summary button to view the details of the registration.
10. The completed registration can now be selected and viewed at the History à Browse screen.
The resubmit option gives you the means to resubmit a previously submitted registration.
When a registration is completed in OPEN the registration is then sent to the associated Lead Organization. If the Lead Organization’s system is not active or for some reason is not available to process the registration it will come back to OPEN in the status “Submitted”. The resubmit option gives you the means to resubmit the registration as necessary. Only registrations that are in “Submitted” status can be resubmitted
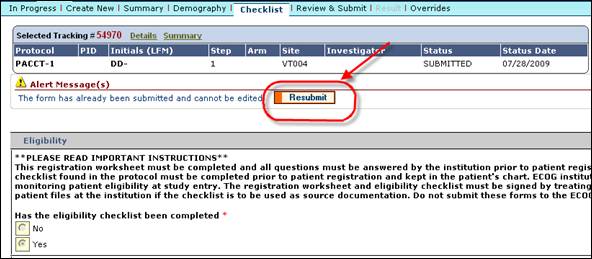
Figure 16: Resubmit a Registration
To resubmit a registration,
1. Select the “Submitted” registration from the In Progress screen
2. Go to the checklist form.
3. On the checklist form you will find the entered checklist for that registration and a “Resubmit” button (as shown in Figure 16).
4. Click on the Resubmit button.
5. If the registration is less than the current date, you will receive a warning message.
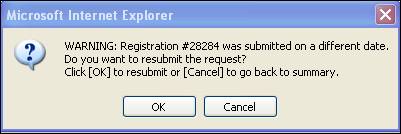
Figure 17: Old Registration Resubmission Warning
6. Click ‘OK’ on this pop-up to continue resubmitting the registration.
7. Review the registration and confirm the submission by pressing the “Resubmit” button on the review page
8. Click “Ok” on the confirmation pop-up
9. If the resubmit is successful you will be given the Lead Organization’s response.
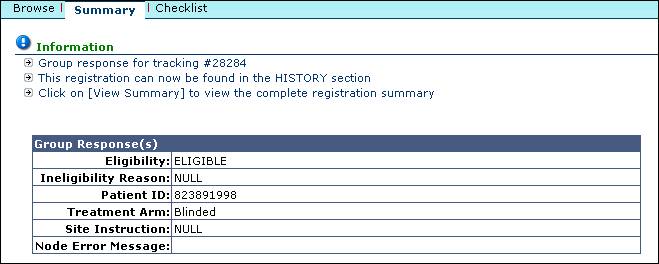
Figure 18: Successful Resubmit
For Protocols that require multiple steps:
1. Follow the steps in the “Creating a New Registration” section of this User Guide to create the initial registration step.
2. Follow the steps in the “Completing the Demography screen” section of this User Guide to create the initial registration step.
3. Follow the steps in the “Completing the Eligibility Checklist” section of this User Guide to create the initial EC.
4. Follow the steps in the “Submitting the Eligibility Checklist” section of this User Guide to submit the initial EC.
5. Click on the History tab.
6. Select the registration you would like to continue.
7. In the Summary screen select the “Create Step _” button. The next valid step will be displayed.
![]()
Figure 19: Create Next Step
8. Click “OK” to copy over the registration details from the previous registration step (see Figure 20).
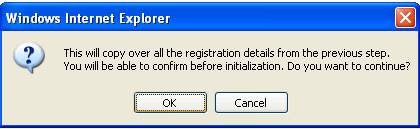
Figure 20: Copy Details Confirmation
9. Review the pre-populated data.
10. If desired make updates to the registration. Only the associated persons section, the specify credits section, the express courier sections (if applicable), and the case notes can be updated.
11. Press the “Continue” button.
12. Press the OK button on the pop up window.
13. Press the “Continue” button. The registration form that is next in sequence will be presented.
14. Once the demography screen is displayed you can enter the patient demography data per the requirements of the protocol.
OR
15. In the Demography form (if applicable), validate that the pre-populated patient ID number from the previous step is correct. Then press the “Populate Data” button. This will retrieve and populate the demographic data for that patient ID. This will be available only in protocols where the associated Lead Organization support pre-filling the demography data.

Figure 21: Populate Data
16. Click “OK” on the Confirmation pop-up screen to retrieve the data.
17. Click the “Continue” button to proceed to the next screen.
18. Complete the Eligibility Checklist form.
19. Press the “Continue” button.
20. Press the “Submit” button on this page.
21. Press the “OK” button on the pop up window.
22. View the registration result.
If a patient is entered in the Demography screen that closely resembles a patient that has been previously registered , the system will flag this registration and alert the user that this is “possibly” a duplicate patient. You are then able to a) state that this is not a duplicate patient and go on with the registration or b) confirm that this is a duplicate patient and the registration in progress will be Voided.
If a patient is entered in the Demography screen that exactly matches a patient that has been previously registered, the system will flag this registration and alert the user that this is a duplicate patient. You are then able to confirm that this is a duplicate patient and the in progress registration will be Voided or you can place the registration currently in progress on hold for further investigation. The on hold registration will go to the status of Incomplete (see section In Progress Registration Status).
Using this tab, the user will be able to view the details of registrations that have been completed (i.e., the patients have been registered/randomized and patient IDs have been received). The various sub-tabs under the history tab are discussed below.
In this section the user is given the means to view the history of all registrations that have been completed at any institution with which they are associated.
OPEN will display the:
· Track #
· Protocol
· Site CTEP#
· Crediting Group
· Registration Step
· PID (Patient ID number)
· Arm (Treatment Arm)
· Eligibility Status
· Status of the registration
· Date and time the registration was initialized
· User who created the registration

Figure 22: History Registrations
To view the registration history of a registered patient:
1. Click on the History tab.
or
2. Click on the “Registration History” link.
3. You will be in the “Browse” sub-tab by default.
4. Press the ‘Select’ button of the registration you wish to view.
5. If the desired registration is not listed click on the arrow keys to navigate to the next range of records. You can also display more records to a single search page by specifying whether the results should list 25, 50 or 75 records per page (For additional information on querying registrations please see the “Query Registration Information” section).
6. Pressing the “Select” button will display the Summary screen of the selected record. You can use the “Demography” or “Checklist” sub-tabs to access the corresponding forms. This will allow you to view the details of the registration.
Registration Statuses will be assigned to the registration when it meets certain criteria. The registration statuses are shown throughout the registration process. Data for completed registrations cannot be updated or changed.
This status is assigned after a registration is submitted to the Lead Organization and a patient ID and treatment arm is returned and received by OPEN.
The registration was deemed ineligible by the associated Lead Organization.
This status is assigned when a completed registration is withdrawn. Only administrators will be able to cancel a completed registration.
In this section you are able to view the registrations that are in progress at any of the institutions with which you are associated. You will be able to retrieve a previously started registration from this area.
OPEN will display the:
· Track #
· Protocol
· Site CTEP#
· Crediting Group
· Registration Step
· Status of the registration
· Date and time the registration was Initialized
· Date and time the registration was Modified
· User who created the registration

Figure 23: In Progress Registrations
7. Click on the Enroll tab. The In Progress screen is shown as default.
8. Press the ‘Select’ button on the line of the registration you wish to view.
9. If the desired registration is not listed click on the arrow keys to navigate to the next range of records. You can also add more records to a single search by specifying whether the results should list 25, 50 or 75 records per page (For additional information on querying registrations please see the “Query Registration Information” section).
10. The record is selected and the Summary screen is displayed showing the information related to the selected record. You can then continue the registration as desired using the “Continue” button or the appropriate sub-tabs to access the corresponding forms that will be viewed, filled out, or edited.
Registration Statuses will be assigned to the registration when it meets certain criteria. The registration statuses are shown throughout the registration process.
A registration is given the status of NEW when the registration is saved for the first time (the demography or eligibility checklist has not yet been started).
This status is assigned after the corresponding checklist form has been started but has not been submitted or has validation errors.
A registration is given the status of READY when the eligibility checklist has been successfully validated and saved and is ready for submission.
A registration is given the status of SUBMITTED when the registration has been forwarded to the Lead Organization but the accepting system is not able to receive the data.
When a registration has been saved but never submitted the registration will automatically change to VOID status after 5 calendar days. The user must then start the registration again.
You are given the option of deleting records that have not been completed by pressing the ![]() icon in the column labeled ‘X’.
icon in the column labeled ‘X’.
1. Click on the Enroll à In Progress tab.
2. Locate the record you would like to delete.
3. Press the trash can![]() icon.
icon.
4. Verify you want to delete the record by saying OK at the confirmation pop-up.
Completed registrations in the History à Browse screen and Submitted registrations cannot be deleted. These registrations will not have the trash can icon available.
Information about a specific item can be displayed by pressing the ![]() icon associated with that item. This icon appears on multiple screens in OPEN. The information will be displayed as seen in Figure 24.
icon associated with that item. This icon appears on multiple screens in OPEN. The information will be displayed as seen in Figure 24.
1. Locate the item about which you need information
2. Press the ![]() icon.
icon.
Figure 24: Information
You will be able to narrow down the registrations displayed in the In Progress or History screens by querying on a single field or on multiple fields. The In Progress tab will display all in progress registrations. The History tab will display all registrations that have been completed.
1. Click on the In Progress tab
Or
2. Click on the History tab
3. Locate the field you want to sort by, you are able to query on any or all of the following fields:
· Tracking Number
· Study
· Site CTEP ID
· Crediting Group
· Registration Step
· Patient ID Number (History Tab only)
· Registration Status
· Status Date
· Modified Date (In Progress Tab only)
· Registrar

Figure 25: In Progress Registration Search Screen
4. Enter the corresponding field information into the appropriate field(s) as seen in Figure 25. The % (percent sign) can be used to perform searches on items that are not completely entered, for example entering “ga0%” in the Site field, will bring back all registrations done at sites that start with the characters “GA0”. Adding multiple search criteria will further reduce registrations returned.
5. Press the “search” button.
6. The filtered information will be returned where a match is found. You will receive a message if no match is found.
7. If the desired registration is not listed click on the arrow keys to navigate to the next range of records. You can also add more records to a single search by specifying whether the results should list 25, 50 or 75 records per page.
8. You can also query by using the “Filter by:” option on select screens (option available on the In Progress and the Browse screens). You can choose to filter a registration by selecting the value you would like to filter by as shown in Figure 26. Using this option you can search on fields which are not displayed on the screen – such as “Case Notes”. Once you find a result, you can use the “Select” button or “View Registration Details” icon to see the details of the corresponding registration.
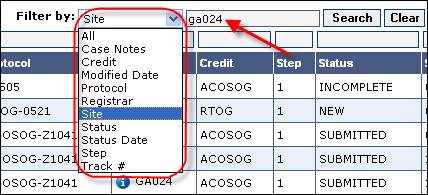
Figure 26: Filter By Option
You can edit a registration as needed however, this screen will only be active if the record is not in the status of ‘Submitted’ or ‘Registered’. Once the record is registered or in submitted status no updates will be allowed.
1. After initializing a new registration click on the “Edit Summary” button.
Or
2. From the summary screen click on the “Edit Summary” button.
3. Update the displayed information as necessary. All sections of the “Create New” screen can be updated after the registration is initiated except for section 1 (Select Institution/Protocol combinations).
4. Make desired changes.
5. Press the “Continue” button.
6. Press the “OK’” button on the pop-up confirmation box.
7. Proceed with the registration.
Overrides to protocol requirements may be available on certain studies per Lead Organization guidelines. A “Request Override” button will be displayed next to only those validation errors which allow overrides. To request an override you may click on the “Request Override” button that will appear in the checklist forms as shown in Figure 27.

Figure 27: Validation Errors on Eligibility Checklist
An override indicator is also available at the question level. Located to the left of the field title, the override indicator is presented. Placing the mouse cursor over the indicator will provide override status information.
![]() – indicates a question is eligible for an override.
– indicates a question is eligible for an override.
![]() – indicates an override request has been initiated.
– indicates an override request has been initiated.
![]() – indicates a question has multiple overrides associated with it.
– indicates a question has multiple overrides associated with it.
![]() – indicates an override has been approved.
– indicates an override has been approved.
![]() – indicates an override has been denied.
– indicates an override has been denied.
![]() – indicates an override is on hold or is pending.
– indicates an override is on hold or is pending.
To request an override for an eligibility question:
1. Complete the demography and/or eligibility checklist forms.
2. Press the save & validate button or the continue button.
3. Review the validation errors (as seen in Figure 27).
4. Press the green button that says “Request Override.” Once an override is requested the button will change from green to orange in color and the message “Override Requested” will show.
5. A new window will appear.
6. If you already have an override code, enter the override code in the Override Code field. (Optional)
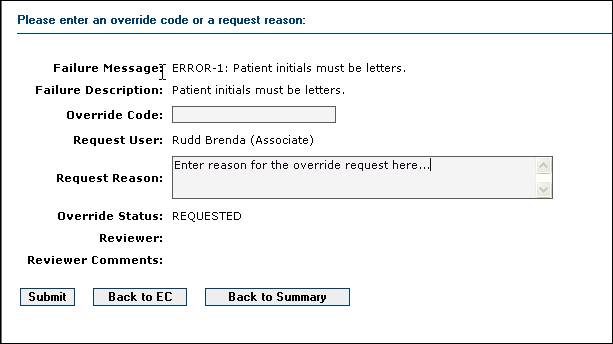
Figure 28: Override Request
7. Enter the reason for the override request (see Figure 28) in the ‘Request Reason’ field.
8. Press ‘Submit’. The override request will be available to the protocol administrator at the Lead Organization for review and approval/denial.
9. You and the protocol administrator will receive an email signifying that an override was requested.
10. Once the protocol administrator reviews the override and assigns a status (e.g., approved, denied) you will receive another email alerting you that the override is ready for further action.
11. You can also click on the “Override Requested” button in the eligibility checklist. You will be able to see the override status for that specific validation error.
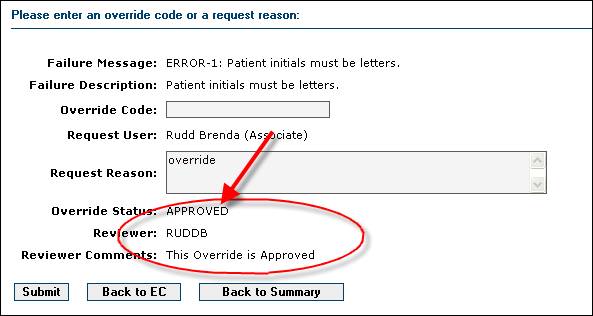
Figure 29: Override Approved
12. Once the Override is approved return to the eligibility checklist and press the “submit” button. If no other validation errors are present the registration will go through.
If the override is denied the “override requested” button will turn red and the verbiage will change to say “Override Denied” as shown in Figure 27. You will not be able to submit the registration without correcting the error.
Other status possibilities are:
· On Hold – An override is pending or holding.
· Inactive – The edit check was inactivated after the override request and the override is no longer required. Resubmit the eligibility checklist.
On the Persons tab (under the RSS tab or the Person Search Link) you are able to search on one specific field or any combination of fields.
The searchable fields include:
· CTEP ID
· Last Name
· First Name
· Status
· Type

Figure 30: Persons Browser
1. Click on the ‘Person Search’ link
Or
2. Click on the RSS main tab
3. Click on the ‘Persons’ sub-tab
4. Enter in the field(s) you want to search on
5. Press the ‘Search’ button.
6. If the desired person is not listed click on the arrow keys to navigate to the next range of records. You can also add more records to a single search by specifying whether the results should list 25, 50 or 75 records per page (for additional information on querying registrations please see the “Query Registration Information” section).
On the Site Registrations tab (under the RSS tab or the Site Registration Search Link) you are able to search on one specific field or any combination of fields. The searchable fields include:
· Site Number
· Protocol
· Status
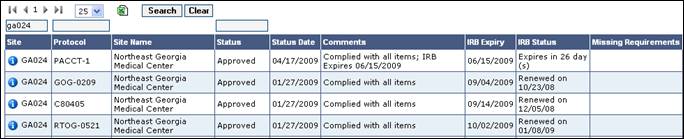
Figure 31: Site Registrations Browser
1. Click on the ‘Site Registration Search’ link
Or
2. Click on the RSS main tab
3. Click on the ‘Site Registrations’ sub-tab
4. Enter the criteria in the field(s) you wish to query on (see the query registration information section).
5. Press the ‘Search’ button.
6. If the desired registration is not listed click on the arrow keys to navigate to the next range of records. You can also add more records to a single search by specifying whether the results should list 25, 50 or 75 records per page.
Reports can be run for a variety of subjects.
1. Click on the ‘Reports’ link from the welcome page.
Or
2. Click on the ‘Reports’ tab.

Figure 32: General Reports
3. Locate the report you would like to run in the report list. You are able to scroll through the reports in order to locate the desired report; or you can search on the desired report by filling in one or more of the report criteria in the top row and pressing the ‘Search’ button.
4. Press the ‘Select’ button that corresponds with the desired report. You are now able to enter in criteria that will determine what is returned in your requested report.
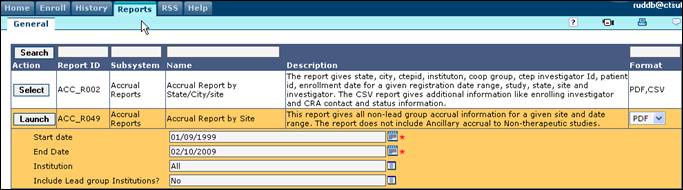
Figure 33: Report Criteria Entry
5. Enter the parameters for the report in the appropriate fields provided.
6. Choose what format you would like the report shown in by clicking on the dropdown and choosing PDF or CSV.
7. Press the ‘Launch’ button to activate the report.
Users will be able to perform a practice registration from the OPEN application. Using the current URL the user is able to switch from a normal working mode to a practice mode to create registrations without actually updating any live data.
1. From the home page select the “Start Practice” button.
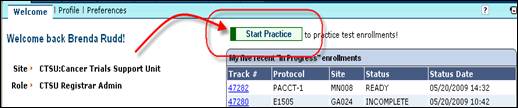
Figure 34: Start Practice button
2. The screen will visibly change in color to indicate that you are in test mode, and the “Stop Practice” buttons will be presented.
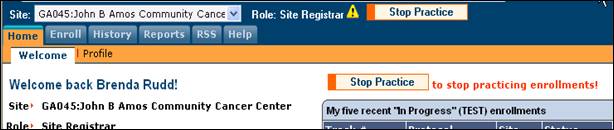
Figure 35: Application in Test Mode
3. While the system is in test mode only the Enroll, History and Help screens will be active. The other tabs if pressed will return a message indicating that functionality is “Not available during practice or test mode!”
4. Registrations can be created as normal (please see the “Creating a New Registration section” of this document). All registrations created while in practice mode will have a super script ‘T’ attached to the tracking number to further indicate this is a test registration.

Figure 36: Test Tracking #
5. Upon final submission, a concluding alert will again remind the user that this is a practice registration.

Figure 37: Final Test Alert