
Oncology Patient Enrollment Network Portal
Site User Guide
December 31, 2007
Logging into the OPEN Application
Login through the CTSU Members Web site
Completing the Eligibility Checklist
Submitting the Eligibility Checklist
Completing a Multiple Step Registration
Site Registrations Search (RSS)
Figure 4: Initialize Registration
Figure 5: Registration Initialized
Figure 6: Selected Registration Information
Figure 11: Copy Details Confirmation
Figure 13: Registration Summary
Figure 15: Registration Search
Figure 16: Validation Errors on Eligibility Checklist
Figure 18: Registration Overrides
Figure 21: Site Registrations Browser
|
Version Number |
Date |
Updated by |
Contributor |
Description |
|
V1 |
8/9/2007 |
Brenda Rudd |
|
Initial Document |
|
V2 |
8/31/2007 |
Brenda Rudd |
|
1st Draft |
|
V3 |
10/05/2007 |
Brenda Rudd |
|
Updated per system changes. System is stable. |
|
V4 |
10/18/2007 |
Brenda Rudd |
|
Updated per system changes |
|
V5 |
11/5/2007 |
Brenda Rudd |
Ravi Rajaram |
Format change |
|
V6 |
11/27/2007 |
Brenda Rudd |
Lucille Patrichuk |
Updated per reviewer feedback. |
|
V7 |
12/20/2007 |
Brenda Rudd |
|
Updated to reflect system updates for the 2nd step process. |
|
V8 |
12/31/2007 |
Brenda Rudd |
Jenny Hopkins Lucille Patrichuk Ravi Rajaram |
Updated per reviewer feedback |
The OPEN portal application system will:
The OPEN Portal application will be used to register patients on any study on the CTSU menu that chooses to include it as a registration option.
|
Minimum System Requirements |
|
|
Computer/Processor |
Computer with a 233MHz processor or higher (Pentium processor recommended) |
|
Operating System |
Windows XP, Windows Vista |
|
Memory |
128 MB of RAM minimum |
|
Display |
Super VGA (800 x 600) or higher-resolution monitor with 256 colors
|
|
Application |
URL |
|
OPEN Portal |
https://esys2.ctsu.org/open/ |
|
CTSU members website |
http://test-members.ctsu.org |
The OPEN Portal business process is shown in the following diagram:
There are two ways to access the OPEN Application, by using the OPEN URL or by going through the CTSU Members’ web site. Both methods are described below.
To log into the OPEN Portal application you will need to:
1. Launch a new Internet Explorer window
2. Type in the URL for OPEN Portal located in the URLs for testing section.
3. The Log-in screen will be displayed and the User ID and password is requested.
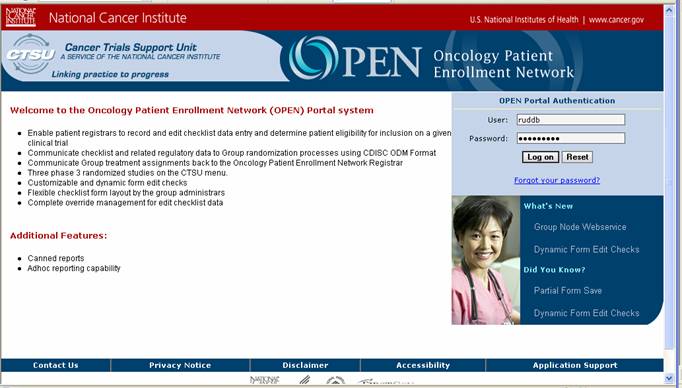
4. Enter your CTEP username in the User field and your associated password in the password field (these are the same username and password you use to enter the CTSU members’ web site).
5. Press the “Log on” button to enter the system
or
6. Press the “Reset” button to clear the entered fields.
The Log on button will validate the entered CTEP ID and password and allow you to enter the OPEN portal application. The welcome screen will be displayed, as shown in Figure 2.
If the CTEP ID and password entered is invalid OPEN will return the message “Invalid username or password. Logon failed”. The user is able to re-enter the CTEP username and password.
If you have additional problems logging in to the OPEN application please contact the CTSU Help desk for assistance at 1-888-823-5923.
You are also given the means to log into the OPEN Portal application via the CTSU members’ web site.
1. Open a new Internet Explorer window
2. Log into the CTSU members web site (https://members.ctsu.org)
3. Go to and click on the tab labeled “OPEN”. This tab will display information specific to OPEN and provide a button to enter the OPEN application.
4. Press the “OPEN” button. The OPEN application will launch displaying the welcome tab as shown in figure 2.
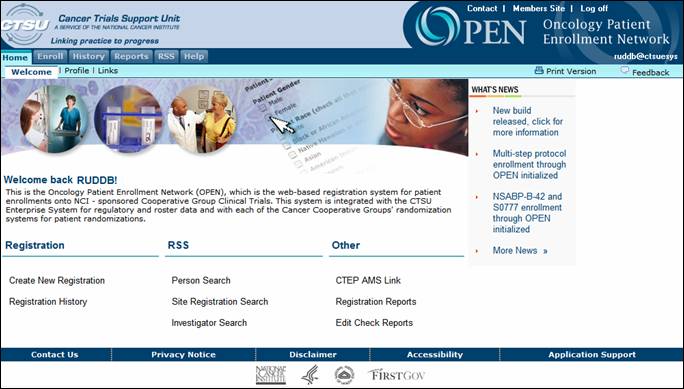
The profile section displays information associated with the CTEP ID of the person who is logged into the OPEN system. All existing data in CTEP-AMSwill be listed, if there is no data for that listing it will be blank.
1. Login to the OPEN application
2. Click on the Profile tab
The following fields are displayed in the profile section:
· Last Name
· First Name
· Person Type
· Account Name
· Account Status
· Status Date
· Registration Expiry Days
· Password Expiry Days
· CTEP ID
· CTEP Investigator ID
· CTEP Title
· HSPCertification
· HSPCertification Type
· HSPCertification Date
Links Menu– Under Construction
The Enroll tab will give you access to multiple means of controlling the registration of a patient. In this section you will be able to create a new registration.
1. Log into the OPEN application
2. Click on the “Create New Registration” link or the Enroll tab. Both of these methods will bring you to the ‘Create New’ tab. The ‘Create New’ tab will allow you to complete the preliminary steps of the registration process.
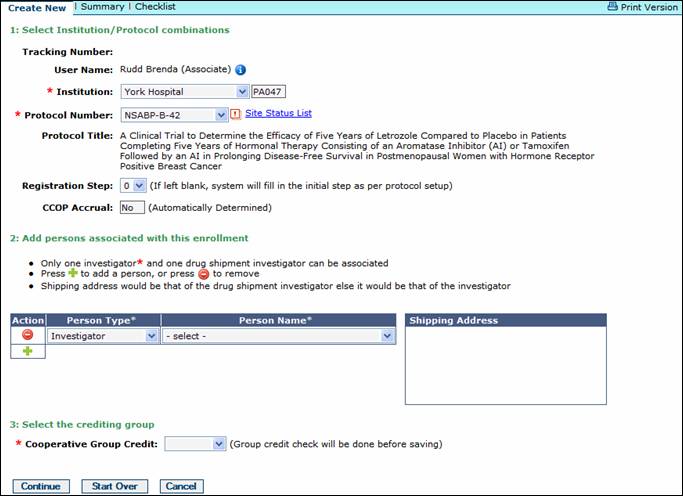
3. Select an institution located in the drop down list labeled “Institution”. The institution name and ID Code will be populated in the field. Only the institutions that you are affiliated with will be listed in the institution drop down. This is a mandatory field and must be populated.
4. Select the protocol number that the patient will be registered under. Only the protocols approved for the institution chosen in the previous step will be listed. This is a mandatory field and must be populated.
*** If an institution or protocol number is not listed that you believe should be listed please contact the CTSU Help desk for assistance at 1-888-823-5923.
5. Click on the “Site Status List” link to receive details on each of the protocols that are associated with the selected institution
6. From the drop down list select the Registration Step you are currently entering. If this field is not entered the system will default to the initial step of the protocol selected.
7. The CCOP Accrual field will be automatically determined.
8. Select the person(s) who are associated with this enrollment. The following person types can be chosen:
· *Investigator (Mandatory) - The registration must have an investigator, this is a mandatory entry. Only one investigator will be allowed to be affiliated with a registration.
· Drug Shipment Investigator - Only one drug shipment investigator will be allowed to be affiliated with a registration.
· Pathologist
· Radiation Oncologist
· Associate
When an Investigator or a Drug Shipment Investigator is populated the address where the drugs will be shipped will be populated (located to the right of the field).
9. Select a credit recipient Group from the drop down list. This is the Cooperative Group that will be credited with the enrollment. This is a mandatory field and must be populated.
10. Press the ‘Continue’ button to proceed to the next step. When the ‘Continue’ button is pressed you will receive a pop up message stating “This will save and initialize a registration process, do you want to continue?”
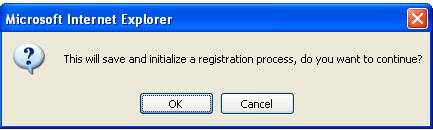
Figure 4: Initialize Registration
11. Press ‘OK’ to initialize the first half of the registration and add a listing to the Registrations à Browse tab (see the Browse Registrations Section). You will then be taken to the next step in the registration process.
Once the registration is initialized you will be supplied with the tracking number that can be used to track a registration in the OPEN Portal application and the option to:
1. View the details of the registration - clicking on the “View Details” button will redirect you to the summary screen.
2. Edit the Registration – this option will redirect you to the registration screen and allow you to edit the registration.
3. Create the Eligibility Checklist for this registration – This option will display the eligibility checklist for the protocol selected in step one.
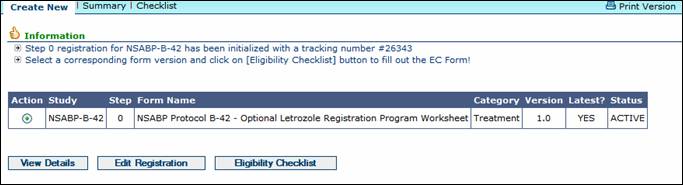
Figure 5: Registration Initialized
The Summary and Checklist Form options can also be initiated from the second row of tabs located at the top of the screen.
Once a registration is initiated and a tracking number is assigned, the identifying registration information will be displayed in the header, as shown in figure 6.

Figure 6: Selected Registration Information
The Checklist Tab will display the eligibility checklist form that is associated with the study you selected in the first step of the registration process. Completing and submitting the Checklist Form will complete the final step in the registration process.
1. Open the eligibility checklist. (If the first step of the registration has not been completed follow the steps in the “Creating a New Registration” section.)
2. Once the checklist form is displayed you are responsible for entering the patient data per the requirements of the protocol.
3. The system will return a validation error if any of the data on the form is invalid or incomplete.
Examples of errors that could be included are:
· Inconsistent date formats
· Dates that are not within a required period of time.
· A field that is inconsistent with another.
Each protocol can have different error checks. These will be determined by the administrators of that protocol and eligibility checklist.
4. Press the ‘Save’ button
You will be able to save the eligibility checklist at any stage. You will receive a message verifying that the data has been saved.
The registration will be saved for no more than 5 business days from the time it is saved. After 5 business days the registration will be deleted and it will need to be re-entered. The system will remind the user of this time limitation at the time the data is saved.

Or
5. Press the ‘Validate’ button
The Validate button will save the eligibility checklist at any stage but it will also review the eligibility checklist for any validation errors; however you will still be able to save the data without making corrections.
The checklist will be retrievable from the History tab by selecting the desired registration and clicking on the “Checklist Form” tab.
By pressing the ‘Submit’ button the user is able to submit the eligibility checklist to the Cooperative Group for approval.
1. Complete the eligibility checklist
2. Press the Submit button.

3. The eligibility checklist is scanned for any validation errors. If validation errors are found you must fix the errors or request and receive an override in order to continue (for more details see the “Request an Override” section).
4. If no validation errors are found you will be given a synopsis of the data entered into the eligibility checklist and asked to confirm the submission or change your entries.
5. If changes are necessary hit the ‘Eligibility Checklist Form’ button and return to the eligibility checklist to update entered data as desired and return to step one of the submit process
6. If no changes are needed click on the ‘Submit’ button on this screen.
7. Click on the “OK” button to submit the form to the Cooperative Group for randomization.
8. The Registration is then submitted to the Cooperative Group for randomization.
9. A confirmation of the randomization details will be displayed. This will include the Patient ID, Treatment Arm and Site Instructions.
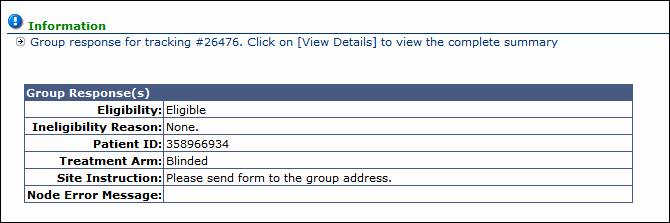
10. Click on the print icon to print the confirmation
For Protocols that require multiple steps:
1. Follow the steps in the “Creating a new Registration” section of this user guide to create the initial registration step.
2. Follow the steps in the “Completing the Eligibility Checklist” section of this user guide to create the initial EC.
3. Follow the steps in the “Submitting the Eligibility Checklist” section of this user guide to submit the initial EC.
4. Click on the History tab
5. Select the registration you would like to continue.
6. In the Summary screen select the “Create Step _” button. The next valid step will be displayed.

7. Click “OK” to copy over the registration details from the previous step registration.

Figure 11: Copy Details Confirmation
8. Review the pre-populated data.
9. Make updates to the registration. Only the associated persons section and the crediting group can be updated.
10. Press the “Continue” button.
11. Click the “Eligibility Checklist” button. The registration EC that is next in sequence will be presented
12. Complete the Eligibility Checklist
13. Press the ‘Submit’ button
14. Press the “Confirm” button
15. Press the “OK” button on the pop up window.
16. View the registration response.
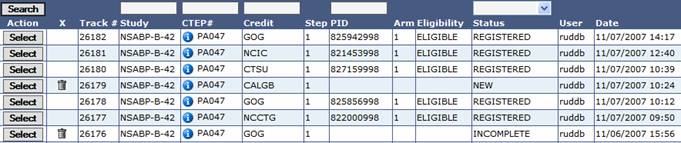
In this section the user is given the means to view the history of all registrations that have been conducted at any institutions with which they are associated.
OPEN will display the:
· Track #
· Study
· Site CTEP#
· Crediting Group
· Step
· PID (Patient ID number)
· Arm
· Eligibility
· Status of the registration
· User who created the registration
· Date and time the registration was saved
1. Click on the History tab
or
2. Click on the Registration History link
3. Press the ‘Select’ button or double click any place on the line of the registration you need to view.
4. The record is selected and the Summary screen is displayed showing the information related to the selected record.
5. View the information
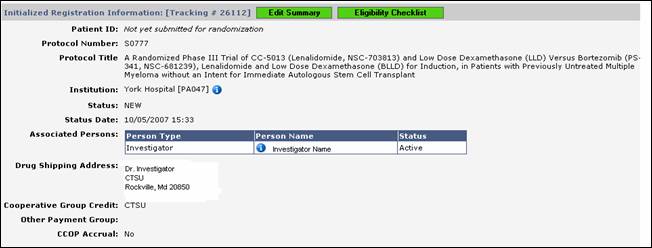
Figure 13: Registration Summary
6. Click the Edit Summary button to edit the record
or
7. Click the Eligibility Checklist button to enter or update the associated Eligibility Checklist.
The Edit Summary and the Eligibility Checklist buttons are color coded. A green field indicates that that option is updatable. An orange field indicates that that option is read-only and not updatable. This will usually occur when the registration has been submitted and is complete.
Registration Statuses will be assigned to the registration when it meets the following criteria. The registration statuses are shown throughout the registration process.
NEW
A registration is given the status of NEWwhen the registration is saved for the first time (the EC has not yet been started).
INCOMPLETE
This status is assigned after the corresponding eligibility checklist has been started but has not been submitted or has validation errors.
READY
A registration is given the status of READY when the eligibility checklist has been validated and saved and is ready for submission.
REGISTERED
This status is assigned after a registration is submitted to the Cooperative Group and a patient ID and Arm is returned and received by OPEN.
VOID
When a registration has been saved but never submitted the registration will automatically VOID after 5 business days.
You are given the option of deleting records that have
not been completed by pressing the  icon
in the column labeled ‘X’.
icon
in the column labeled ‘X’.
1. Click on the History tab
or
2. Click on the Registration History link
3. Locate the record you would like to delete
4.
Press the trash can icon.
5. Verify you want to delete the record by saying OK at the confirmation pop-up
Completed registrations can not be deleted. Completed registrations will not have the trash can icon available in the ‘X’ column for that field.
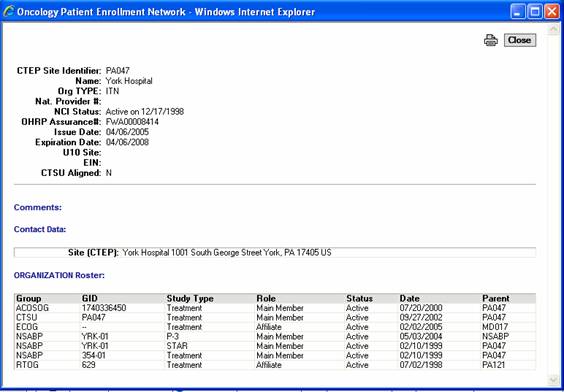
Information about a specific item can be displayed by
pressing the  icon
associated with that item. The Information will be displayed as
seen in figure 11.
icon
associated with that item. The Information will be displayed as
seen in figure 11.
1. Click on the History tab
or
2. Click on the Registration History link
3. Locate the item you would like information on
4.
Press the icon.
You will be able to narrow down the registrations displayed by querying on a single field or on multiple fields.
1. Click on the History tab
or
2. Click on the Registration History link
3. Locate the field you want to sort by, you are able to query on any or all of the following fields:
· Study
· Site CTEP ID
· Credit
· Patient ID
· Status

Figure 15: Registration Search
4. Enter the corresponding field information into the appropriate field(s) as seen in figure 12. The % (percent sign) can be used to perform wildcard searches.
5. Press the “search” button.
6. The filtered information will be returned where a match is found. You will receive a message if no match is found.
1. Click on the “Edit Registration” button after creating a new registration or the “Edit Summary” button from the summary screen.
2. Update or delete displayed information. (The Institution field and the Protocol Number field cannot be updated once the registration has been initiated.)This screen will only be active if the record is not in the status of ‘Registered’. Once the record is registered no updates will be allowed.
3. Press the “Save” button.
4. Press the “OK’” button on the pop-up confirmation box.
Overrides to protocol requirements may be available on certain studies per Cooperative Group guidelines. A “Request Override” button will be displayed next to only those validation errors which allow overrides. To request an override you may click on the “Request Override” button.
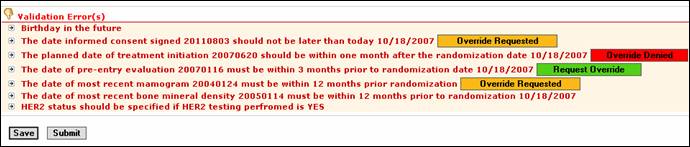
Figure 16: Validation Errors on Eligibility Checklist
1. Fill in the eligibility checklist
2. Press the submit button
3. Review the validation errors (as seen in figure 13).
4. Press the button that says “Request Override”. Once an override is requested the button will change from green to orange in color and the message “Override Requested” will show.
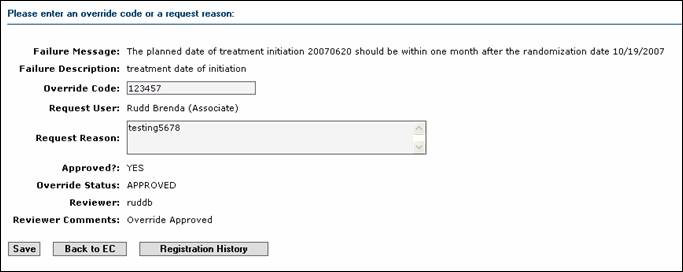
5. Enter the reason for the override request (see figure 14) in the ‘Request Reason’ field.
6. If you already have an override code, enter the override code in the Override Code field. (Optional)

7. Press ‘Save’. The override request will be available to the administrator for review and approval/denial.
8. Press the view icon. Once the administrator responds to the override the results of the request can be seen in the “Overrides associated with this registration” section of the Summary screen. Pressing the View icon will show you the details of your request and the override status.

Figure 18: Registration Overrides
OR
9. Click on the “Override Requested” button in the eligibility checklist. You will be able to see the override status for that specific validation error.
10. Once the Override is approved return to the eligibility checklist and press the “submit” button. (If no other validation errors are present the registration will go through.)
If the override is denied the “override requested” button will turn red and the verbiage will change to say “Override Denied”.
Other status possibilities are:
· On Hold – An override is pending or
· Inactive – The edit check was inactivated after the override request and the override is no longer required. Resubmit the eligibility checklist.
On the Persons tab (under the RSS tab or the Person Search Link) you are able to search on one specific field or any combination of fields, although the “Last Name” field is mandatory and must be filled in. If this field is not populated you will receive a validation error and will not be able to proceed.
The searchable fields include:
· Last Name *
· First Name
· Status
· Account Name
· Type
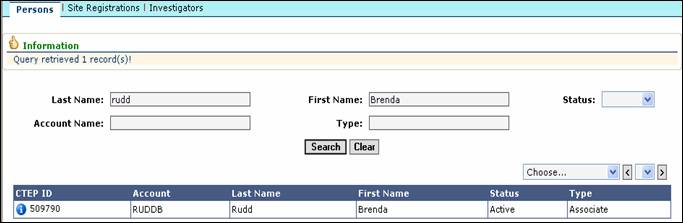
1. Click on the RSS main tab
2. Click on the ‘Persons’ sub-tab
or
3. Click on the ‘Person Search’ link
4. Enter in the field(s) you want to search on
5.
Press the ‘Search’ button. OPEN will bring back the records
that match the search criteria. If there are more than 50 records that
match the entered criteria only the first 50 will be returned. If
the record you are searching for is not in this list, you must narrow
your search by adding additional criteria. For example if you entered
in the last name only, try adding the first name or account number too.
On the Site Registrations tab (under the RSS tab or the Site Registration Search Link) you are able to search on one specific field or any combination of fields. The ‘Site Number’ field or the ‘Protocol’ field must be populated in order to perform a search.
The searchable fields include:
· Site Number
· Protocol
· Registration Status
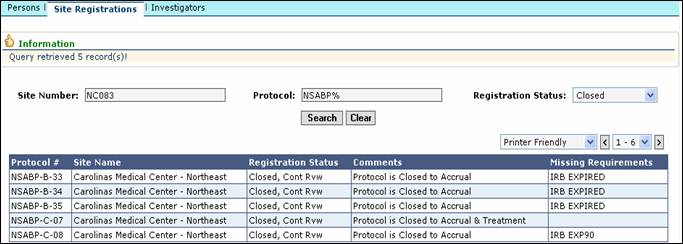
Figure 21: Site Registrations Browser
1. Click on the RSS main tab
2. Click on the ‘Site Registrations’ sub-tab
or
3. Click on the ‘Site Registration Search’ link
4. Enter in the field(s) you want to search on
5.
Press the ‘Search’ button. OPEN will bring back the records
that match the search criteria. If there are more than 50 records that
match the entered criteria only the first 50 will be returned. If
the record you are searching for is not in this list, you must narrow
your search by adding additional criteria. For example if you entered
in the ‘Site Name’ only, try adding the Protocol or Registration Status
also.
UNDER CONSTRUCTION