Auditor Access to the Uploaded Packages
As noted previously, auditors would typically start the remote audit process in the SAP on the CTSU website (although direct access is available to the SDP Audit Review screen).
- Log in to the CTSU members website.
- Note: Auditors who have both LPO and site-level roles should select the option for LPO User at the top of the screen (see box near top of Figure 1).
- Click on the Auditing & Monitoring link and choose Site Audit Portal.
- Once in the SAP, use the drop-down to filter for either Scheduled or Ongoing audits to find the correct audit.

Figure 1. Ongoing audit in the Site Audit Portal with user type selector and icons for accessing audit documents in the SDP.
Once viewing the correct audit, there are two ways to access uploaded documents in the SDP:
- Use the
 icon at the patient level to access individual patient documents in the SDP.
- Use the
 button at the audit level to access all the patients and documents uploaded for the audit.
Upon clicking on one of the icons, the SDP will open in a separate tab, and the system will check the auditor’s identity, roles, and training status. If the auditor has not completed the required training in CLASS, they will receive the error message shown in Figure 2. They must complete the training before proceeding.
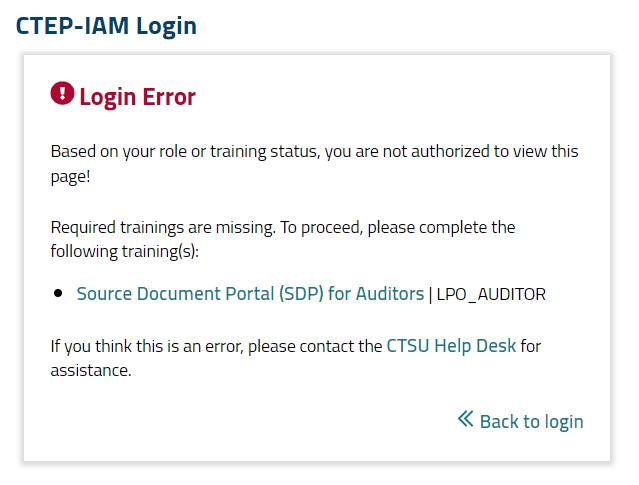
Figure 2. Missing training error message.
Note: As noted previously, it can take the involved systems up to six hours to process completion of the CLASS training.
Audit Review Page
Once an auditor connects to the Audit Review page of the SDP (see Figure 3), a list of documents (or audit packages) uploaded for the audit will populate. If the auditor has been requested to upload patient documents on the sites behalf they can do so on this page by clicking the document button on the top right  of the page. In the document details popup window, verify the filter has the correct information for protocol, site, patient, and document type before uploading the package.
Whether the table on the Audit Review page will display all patients for the audit or a single patient depends upon which icon the auditor used in the SAP to access the SDP. Regardless, each row of the table represents a single uploaded document and includes information on the applicable LPO, protocol, site, patient, document type, status, and who last updated the upload and when.

Figure 3. Audit Review page of the SDP showing documents based on the audit selected in the filter.
Documents that have a document type that begins with the words Audit Package (and therefore an activity tag of AUDIT) will be available for viewing. Of note, sites have been instructed to use only the Audit Package document type when uploading materials for a remote audit. To access/open one of the packages, double-click on the hyperlinked document name.
If a site states that they inadvertently used a different document type for some of the audit documents, go to the SDP Browser → Document Repository page and search for the documents by protocol and patient; this will expose all uploads for the patient, even those that aren't linked with the AUDIT activity.
The following tools and icons are available on the Audit Documents screen:
- Audit Selection drop-down.
- Filters for use with any or all columns in the table.
 I buttons provide information on each entity, i.e., protocol, site, or person.
 Document History icon shows all actions related to the document, including who performed them and the dates and times.
 PDF icon and hyperlinked document type opens the document viewer.
 Export icon allows export of the table to Excel or PDF.
Viewing an Uploaded Document
When an auditor double-clicks on a hyperlinked document type within the table, the package will open in a separate Document Details window (see Figure 4). It is likely that each package will consist of multiple pages. Scroll through the entirety of each package (using the scroll bar on the right) to ensure that it contains what is expected based on the site, study, and patient and that the site properly redacted all necessary PII; as noted previously, the only PII that can be left unredacted is the subject's DOB and initials. Note that the site staff who uploaded the package may have updated or added an annotation to indicate the contents of the package (e.g., if they uploaded multiple packages of the same document type by cycle and want to specify which cycle a given package contains).
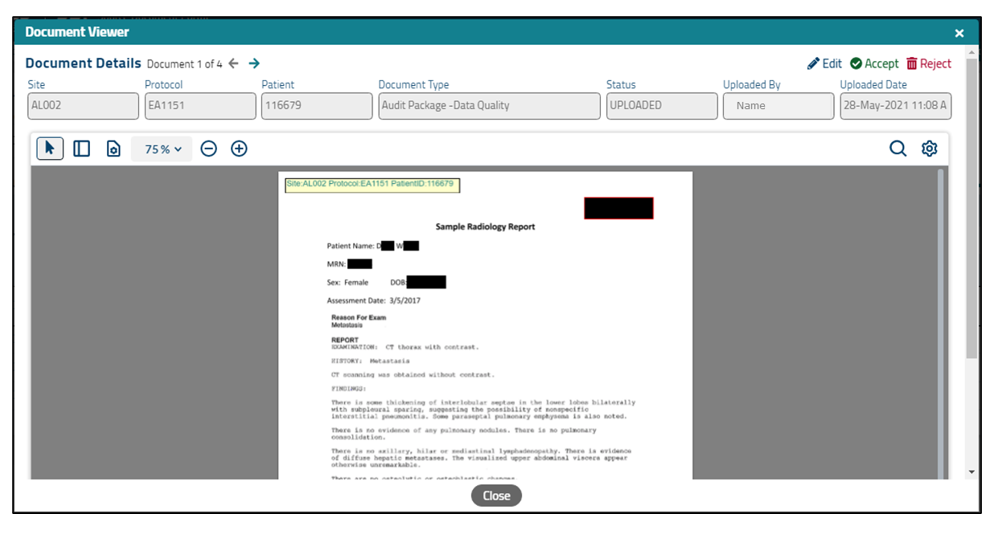
Figure 4. Document Details screen showing selected document with annotation and redactions.
The features and tools available within the Document Details screen are shown in Figure 5.
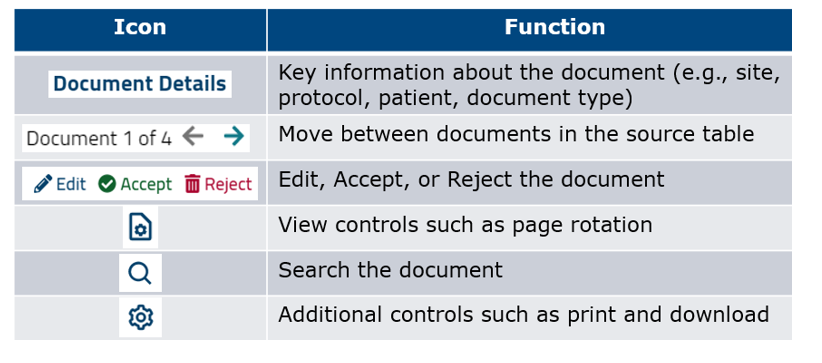
Figure 5. Features and tools within the Document Details screen.
Edit, Accept, or Reject Documents
- Edit: If the document includes the correct pages but the document type was set incorrectly, it is possible to modify the document type. For example, if the package was uploaded to satisfy patient eligibility but instead was labeled as document type of Audit Package – Data Quality, click on the Editicon, select the document type drop-down, and choose the correct value. Check the check box and then click Save at the bottom of the pane to complete the update.
If the site failed to redact some required elements of PII, an auditor can choose to do the redaction on their behalf or reject the document. If performing the redaction, click on the Edit icon, access the redaction tool and obstruct the PII as necessary (go here to receive instruction on how to redact content in the SDP). Check the check box and then click Save at the bottom of the pane to complete the update.
- Accept: If the audit package has been properly redacted and uploaded, click the Accept icon. This will mark the package as TRIAGED. (It is not mandatory that auditors accept/triage documents uploaded for audits, but it can be helpful.)
- Reject: In the case of a package that needs to be rejected (e.g., it is entirely the wrong document, or does not appear to have undergone any redaction of PII and the site needs to do the redaction and upload again) click on the Reject icon and enter a reason for the rejection. Rejecting the document will completely remove it from the SDP and will generate an automated email to the site informing them of the rejection and the need to upload the package again.
Searching Within Documents
Documents uploaded to the SDP can be searched for a word or phrase using the functionality within the PDF viewer. This can be useful for documents with many pages or when searching for PII or other terms of interest.
To access the search pane, click the search icon at the top right of the uploaded document (as shown in Figure 4). The search pane can also be viewed by clicking the mouse pointer anywhere within the document and entering the hotkey "CTRL-F."
Note: Not all documents are searchable. Documents that are scanned prior to upload will be images of the document with the text layer removed. These images, even though saved as *.pdf, cannot be searched within the PDF viewer in the SDP.
To search the document, enter a word or phrase within the search field and click the search  icon. If the document is searchable and at least one match is found for the word or phrase, the results will show in the search pane with page numbers and hyperlinks to the term within the document.